
External system integration
You can integrate with external systems using four methods: SAML, SCIM, Custom SSO, and LDAP.
To get started, select Site customizer from the side menu, click Basic settings, and open the Basic information tab.
Select System integration tab on the Basic settings.
*Note that we cannot assist with issues arising from your use of Site customizer. For details on potential issues, click here.
Required
Customization option, Site customizer, Management role of Co-admin
SAML
If you want to use SAML, turn on the toggle key of SAML.
*For all settings, make sure to click Save at the bottom right of the screen before finishing.
Introduction
Regarding the use of SAML, refer to Single sign-on SAML protcol.
SAML integration with Microsoft Entra ID:
You can use SAML authentication with Microsoft Entra ID.
*For more details, refer to SAML integration settings in Microsoft Entra ID.
Advanced settings
01. Automatically register account upon successful SAML authentication
When you succeed in SAML authentication with an account that does not exist on learningBOX and try to register it as a new account, turn on the toggle key.
02. Include Requested Authn Context Attribute
Turn the toggle off if you want to support Microsoft 365.
03. SAML advanced settings
Register your IdP information.
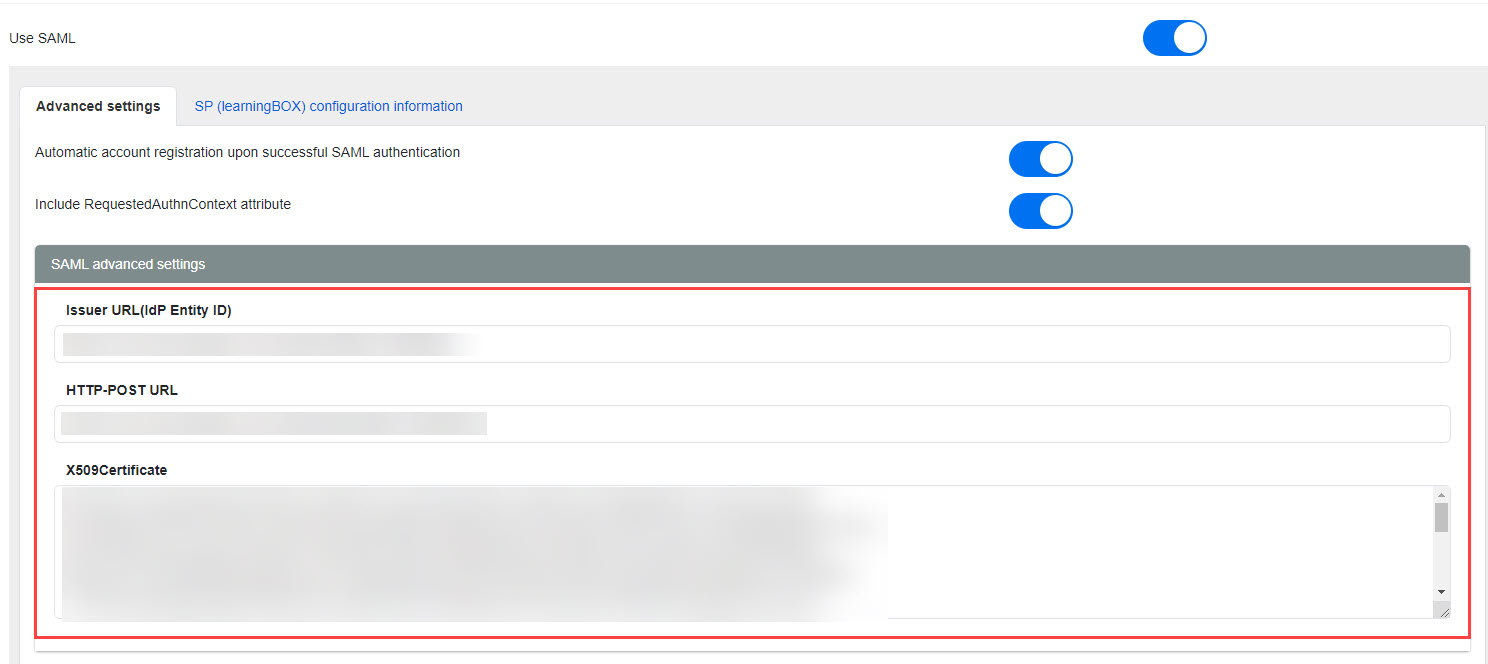
04. SAML parameter mapping
Configure which parameter values to apply to the login ID, name, and email address respectively.
Enter them directly, or click Add to open the Add Fixed Parameter Tag screen and select from the dropdown menu.
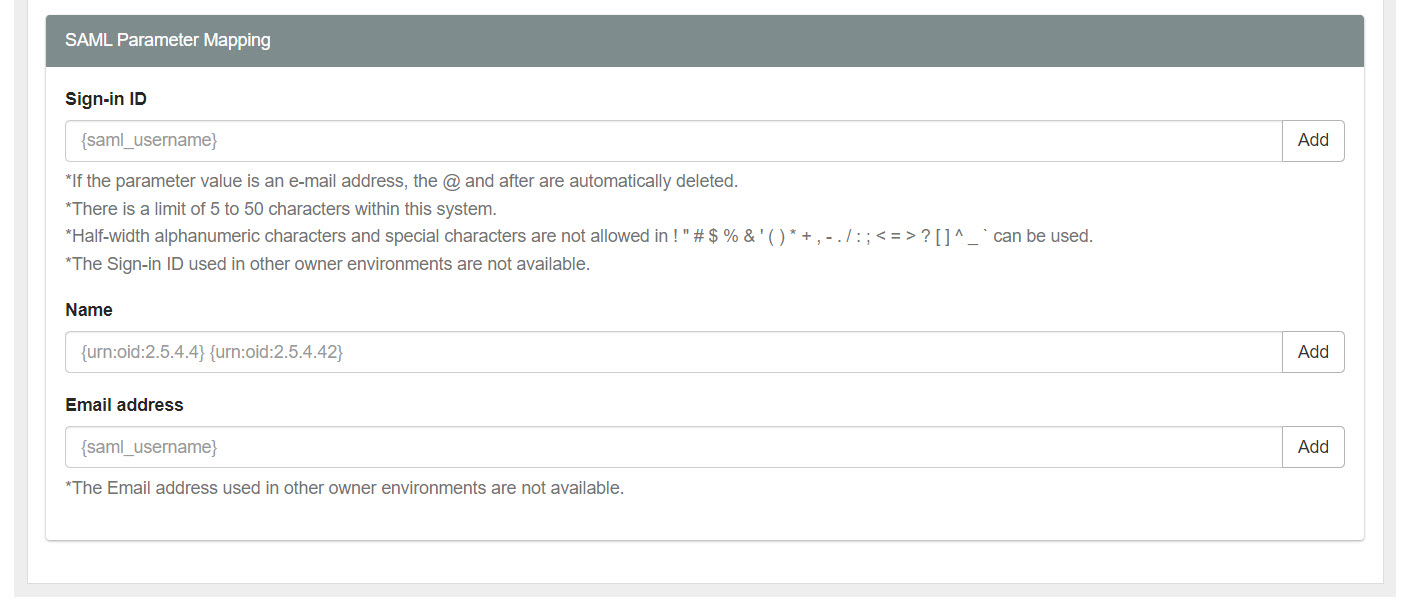
Input field settingsIf you choose not to use "Login ID" in "Login ID", a random string will be applied to this "Login ID".
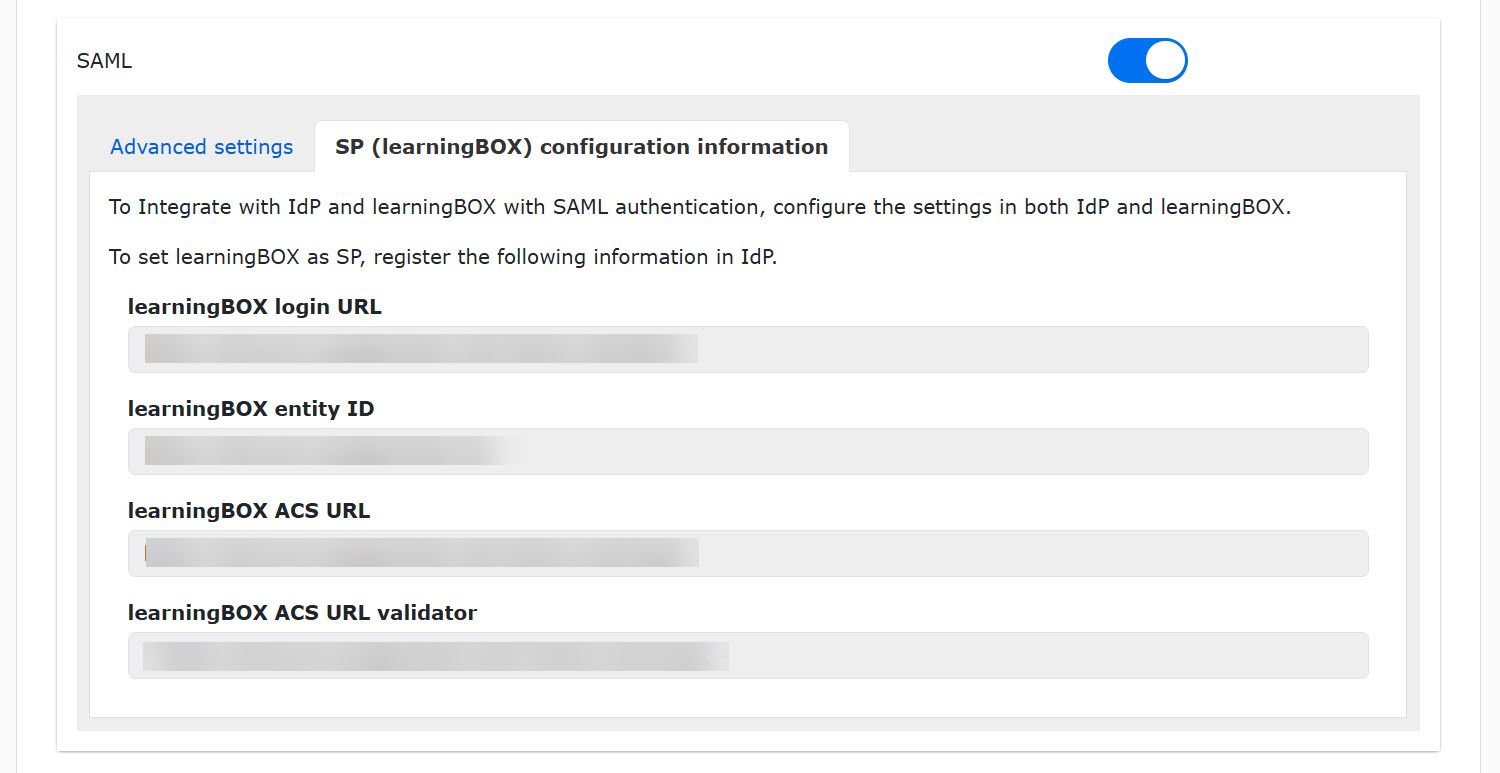
SP (learningBOX) configuration information
The information required to register learningBOX as an SP with your IdP is listed.
Enter this information into your IdP.
SCIM
SCIM provisioning with Microsoft Entra ID:
You can use SCIM synchronization with Microsoft Entra ID.
*For more details, refer to SCIM provisioning with Microsoft Entra ID.
SCIM settings
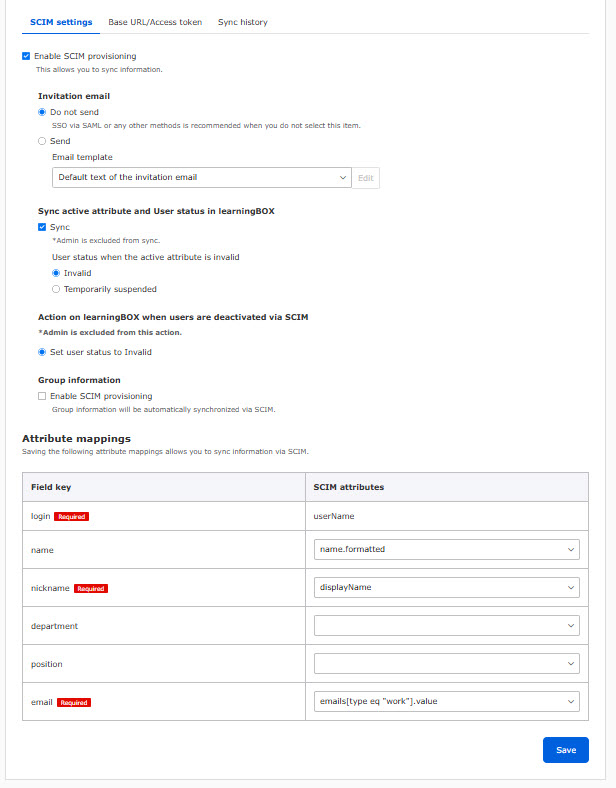
*For all settings, make sure to click Save at the bottom right of the screen before finishing.
01. Enable SCIM provisioning
If you want to use SCIM provisioning, tick Enable SCIM provisioning.
02. Invitation email
You can choose whether to send an invitation email when registering new users to learningBOX through IdP synchronization.
If you choose to send them, also select an email template from the dropdown menu.
*If you choose not to send them, passwords will not be generated.
03. Sync active attribute and user status in learningBOX
You can sync the active attribute on the IdP side with the user status in learningBOX.
Check Sync if you want to sync them.
Select Invalid or Temporarily suspended for the user status when the active attribute is invalid.
*Admin in learningBOX is excluded from the sync of the user status.
For more information about user status, refer to Add user.
04. Action on learningBOX when users are deactivated via SCIM
When a user is deleted on the IdP side, the status of the corresponding user in learningBOX automatically changes to Invalid.
Depending on the IdP, the above action may occur when user information is permanently deleted.
If it is not permanently deleted, the action configured in 03. Sync active attribute and User status in learningBOX may be applied instead.
05. Sync group information
You can sync the group hierarchy configured on the IdP side with the information of users belonging to that group hierarchy.
Tick Enable SCIM provisioning to sync.
You can also select whether Archive group or Delete group when a group is deleted via SCIM.
If you untick synchronization after linking groups, you will not be able to delete SCIM-linked groups or remove users from SCIM-linked groups on the learningBOX side.
If you need to perform deletions or other changes, tick Enable SCIM provisioning and modify the group settings on the IdP side.
06. Mapping
Synchronization becomes possible by mapping field keys in learningBOX with SCIM attributes on the IdP side.
▼ Field Keys
Field keys used on the learningBOX side will be displayed.
These can be edited or added under Input field settings.
▼SCIM attributes
Select the SCIM attribute to correspond with each field key in learningBOX from the dropdown menu.
Leave items unselected if synchronization is not required.
*Even if a field key is set to Unchangeable, mapped items will still be updated during synchronization.
Base URL/Access token

You can check Service Provider information and issue tokens.
01. Base URL
You can copy the Service Provider information to register in your IdP.
02. Access token
You can issue a token to register in your IdP.
*If already in use, reissuing it will require you to re-register the token on the IdP side.
Sync history
The SCIM synchronization history will be displayed.
You can review history from the past year.
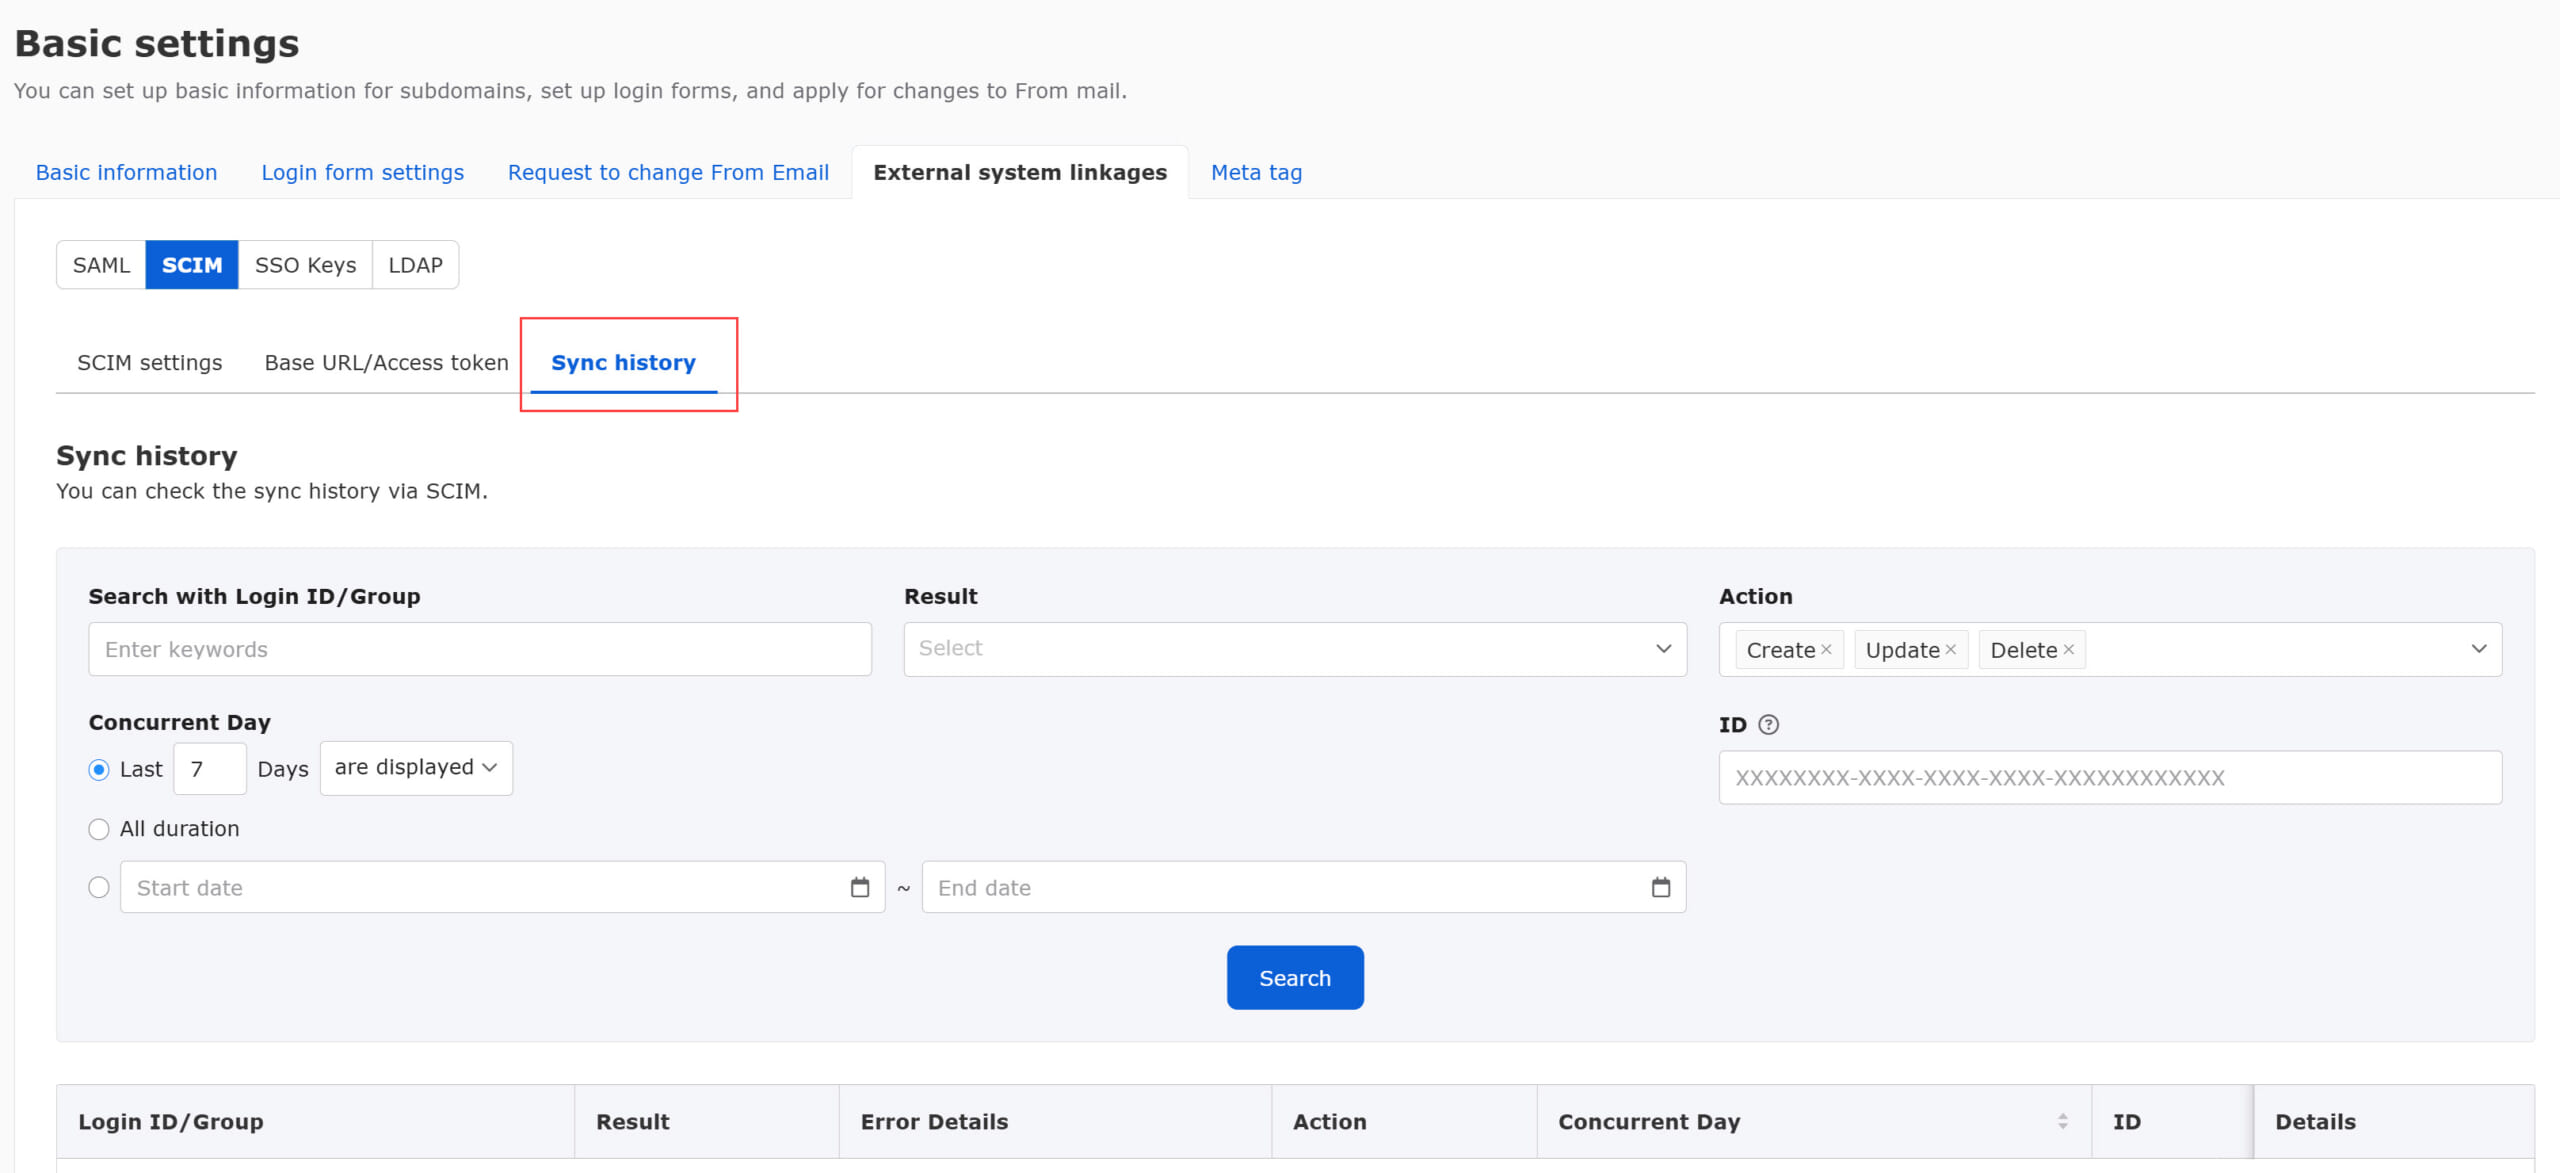
01. Search
You can filter by the following items:
- Login ID/Group
- Result
- Action
- Concurrent Day
- ID *Enter the 36-character ID that is the SCIM resource identifier.
02. Display sync history
The following items will be displayed:
▼ Login ID/Group
The login IDs and groups of the target users for synchronization will be displayed.
▼ Results
The sync results will be displayed.
▼ Error Details
Error details will be displayed if synchronization fails.
▼ Action
The request type (Create / Get / Update / Delete) will be displayed.
*In the default filter state, Acquire is hidden.
▼ Concurrent Day
The date and time the request was received will be displayed.
You can also sort in ascending or descending order.
▼ID
The 36-character ID, which is the SCIM resource identifier, will be displayed.
▼ Details
Request details and response details will be displayed in JSON format.
Users and Groups synced via SCIM provisioning
*For more details, refer to Users and groups synced via SCIM provisioning.
Using Custom SSO Keys
You can use learningBOX's custom single sign-on.
Register SSO key
01. Create new
Click + Create new.
*Up to 100 keys can be registered.

02. Fill in the form
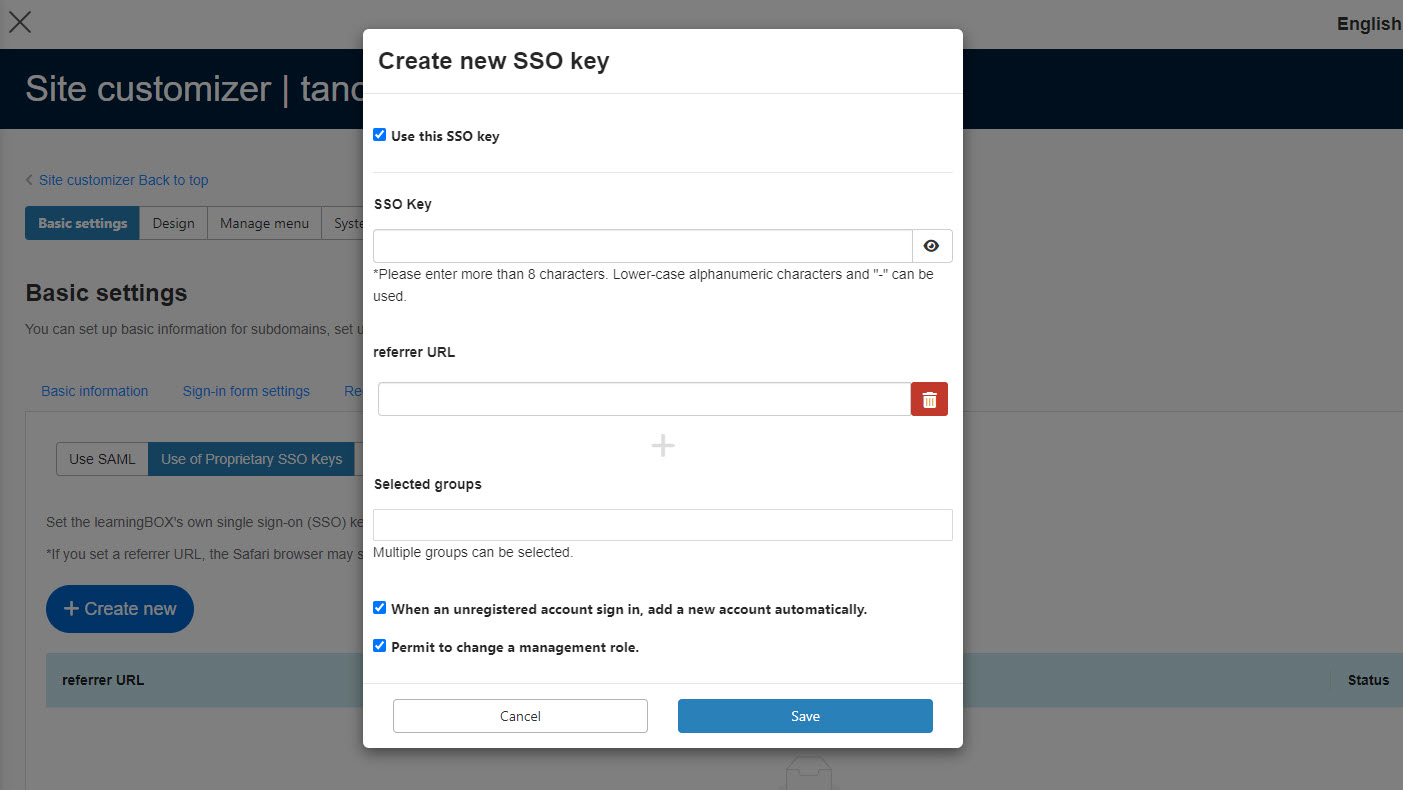
Configure each of the following items.
▼ Use this SSO key
Tick the box to use the SSO key you have set up.
▼SSO Key
You can check the SSO reference.
SSO ReferencePlease refer to the link in the "Contact Us" section and enter the information.

▼ Referrer URL
By configuring this, you can restrict access so it is only allowed from the entered URLs.
Clicking the + icon allows you to add a referrer URL.
If you want to delete one, click the trash can icon.
*You can set up to 10 referrers per SSO key.
▼ Target group
You can specify groups that are allowed to log in.
*Multiple groups can be specified.
Note that if left unconfigured, no group-based restrictions will be applied.
▼Automatically create a learningBOX account when an unregistered account logs in
You can select whether to create a new account when an unregistered account logs in.
Tick the box if you want to create one.
▼Allow account permission changes
You can select whether to allow permission overwrites when permission-related parameters exist in the SSO.
Tick the box if you want to allow it.
If you tick Automatically create a learningBOX account when an unregistered account logs in, an unregistered account will still be able to log in even if you specify allowed groups under Group. Additionally, the account will be registered as a member of the specified group.
Edit/delete SSO keys
Click the ︙ icon > select Edit or Delete.
*For details on items to edit, refer to Register SSO key.

Use LDAP
You can use integration with external systems via LDAP.
*For detailed usage, refer to Use LDAP.