
Manage discussions
You can create discussion channels and manage interactions within channels.
*For more information about the discussion, please see "Discussions.
Required
Content assignment authority OR grade management editing/viewing/grading/grade approval authority
If you signed up for customization prior to March 18, 2026, you will be able to use the Site Customizer's "Manage menu within the Site customizer.
Discussion List
You can see a list of discussions.
01. Open the discussion management screen
Click on "Discussion Management" in the side menu.
02. User interface
The following lists the discussions you have created and the names of the courses and folders in which they are stored.
Here you can check the number of channels and the date of editing.
Note that those with no channels set or those that have reached the maximum number of channels (500) are displayed in color.

Discussion Channel List
You can create and edit channels.
01. Open the Discussion Channel List (for administrator) screen.
Clicking on each discussion opens the "Discussion Channel List (for administrators)" screen.
The "Discussion channel list (for administrators)" screen can also be accessed from the content management screen.
To do so, you must have one of the following administrative permissions:
- Management role of Content manager (Edit/View + Assign)
- Content management editing/viewing privileges + grade management privileges

02. Channel Creation
A new channel can be created from "+Create Channel".
Note that content allocation authority is required for creation.

This section is divided into two tabs: "Batch Creation by Group / Group Selection Assignment".
Batch creation by group
Create channels one at a time, in batches, for each selected group.
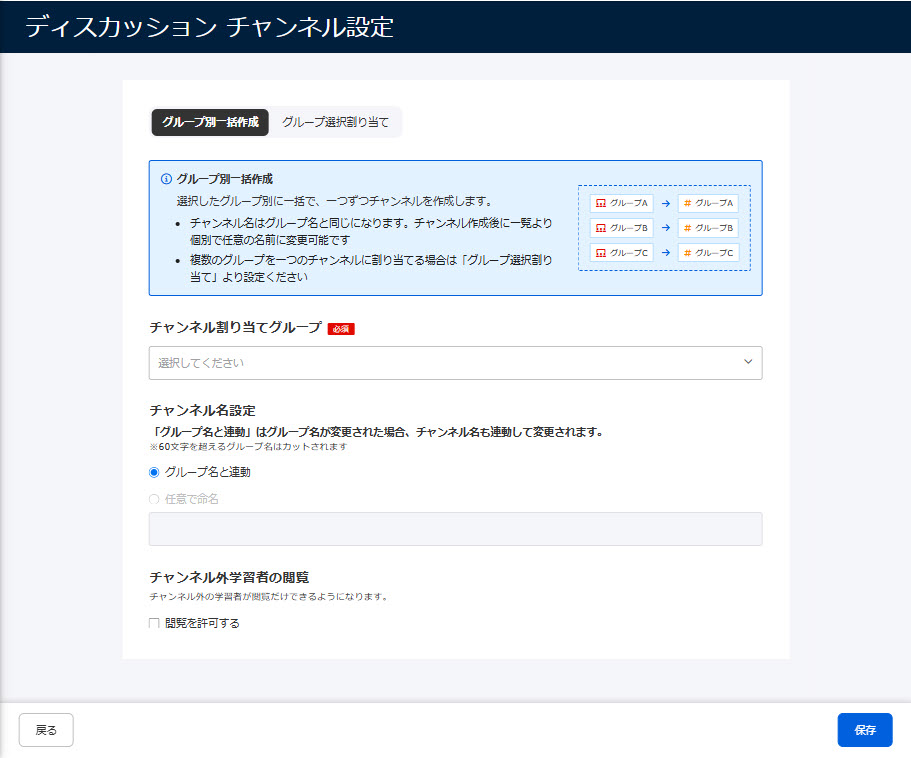
Configure the following items:
▼ Channel Assignment Group
Select a group from the pull-down menu.
To deselect a group, click on the group's ✕ button or click on the group's ✔ again in the pull-down.
▼Channel name setting
Only "Linked to group name" can be selected.
*After registration, the name can be changed to any name.
▼Viewing of off-channel learners
Select whether or not to allow learners outside the channel to view it.
If you wish to allow it, please tick the "Allow viewing" box.
group selection assignment
Creates a single channel from multiple selected groups.
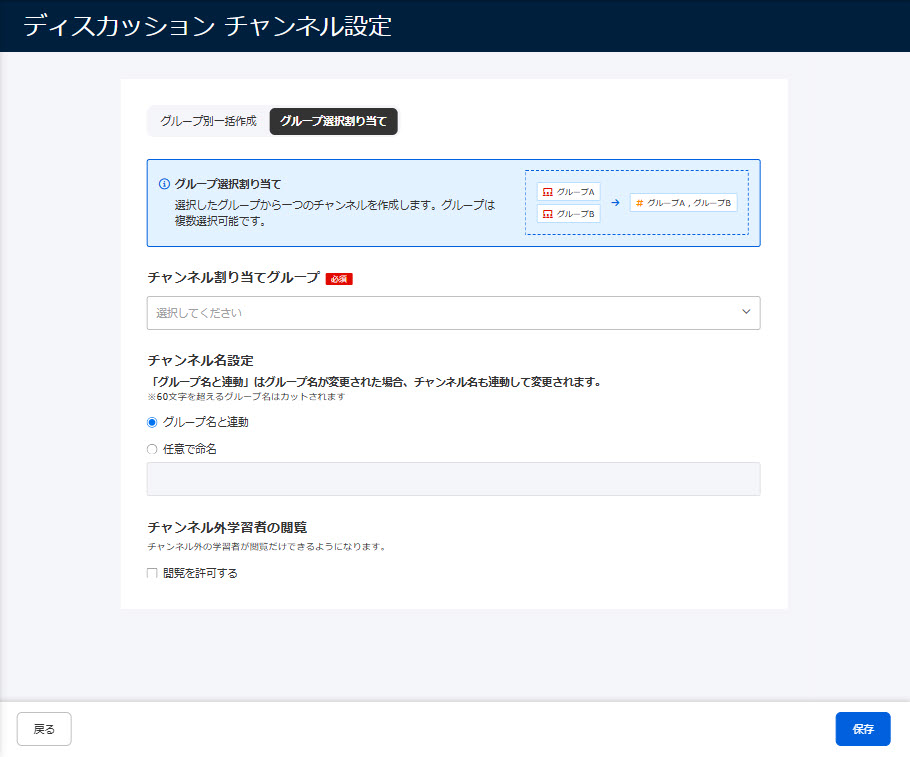
Configure the following items:
▼ Channel Assignment Group
Please select a group from the pull-down menu (multiple selections allowed).
To deselect a group, click on the group's ✕ button or click on the group's ✔ again in the pull-down.
▼Channel name setting
The following options are available:
If you select "Named arbitrarily," enter the channel name in the space provided.
- Linked to group name
- Arbitrary naming
▼Viewing of off-channel learners
Select whether or not to allow learners outside the channel to view it.
If you wish to allow it, please tick the "Allow viewing" box.
03. Template list
The channels you have created will be listed.
By turning the "Show only managed channels" toggle On/Off, you can select whether to limit the number of channels to be displayed to only those that are managed.

About Submission Management
The display varies depending on the operator's grade control authority.
- Managed by: Grade Control Edit/Grading Authority for Groups
- Read-only: If you have grade control viewing/grade approval privileges for the group
- Access denied: when there is no grade management authority for the group
For channels with multiple groups selected in "Group Selection Assignment," you must have grade management privileges for all groups in the channel to be eligible for management or view-only.
04. Changing channel settings
You can change the contents of the channels you have created.
Select the "︙" icon > "Change Channel Settings" for each channel.
The items to be edited are the same as when creating a new channel, so please refer to "02.
*When editing, it is not possible to switch between "batch creation by group/group selection assignment".

05. Deleting a channel
You can delete a channel you have created.
Select the "︙" icon > "Delete Channel" for each channel.
It is also possible to delete all channels at once.
Select the "︙" icon on the right side of the screen > "Bulk Delete Channels".
*Content allocation authority (for all users) is required.

06. Displaying the Discussion Management Screen
Click "Discussion Management" in the upper right corner of the screen.

07. Open channel screen
Click on each channel to open the channel screen.
*Only the channels to be managed can be edited.

08. Create a new thread
You can create new threads as an administrator.
To create a new thread, please go to "+ New Thread".
To stop creation, click "Cancel.

09. Reply to thread
As an administrator, you can reply to others' posts.
If you wish to reply, please go to "Reply" or "0 replies" of others' postings.
To stop receiving replies, click on "Cancel".

10. Deleting threads of other users
The administrator can delete threads of other users.
The "︙" icon > "Delete" is available.
This can be used in the event of inappropriate content being posted.
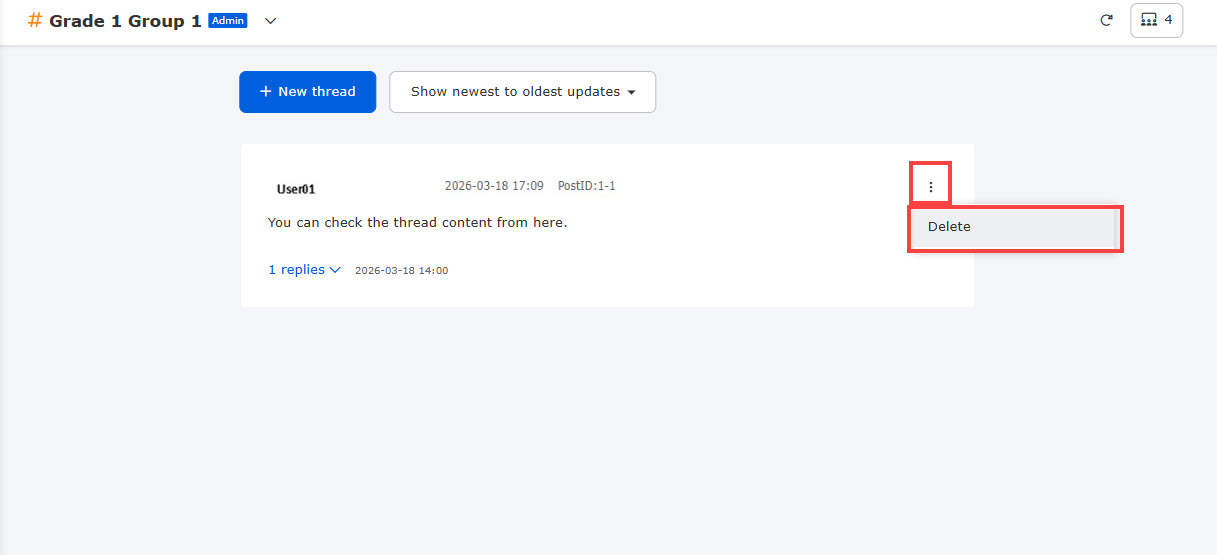
Deleted threads
When a thread is deleted by the learner himself/herself or by the administrator, the administrator's screen will show the deleted content as it is, with the words "Deleted" in the channel.

11. Reordering threads
The pull-down menu at the top of the screen allows you to change the order of threads in the following three ways
- Displayed in order of update
- Threads listed in order of oldest to newest
- Threads are sorted by newest to oldest

12. Update
The reload icon in the upper right corner of the screen allows you to refresh the thread list screen.
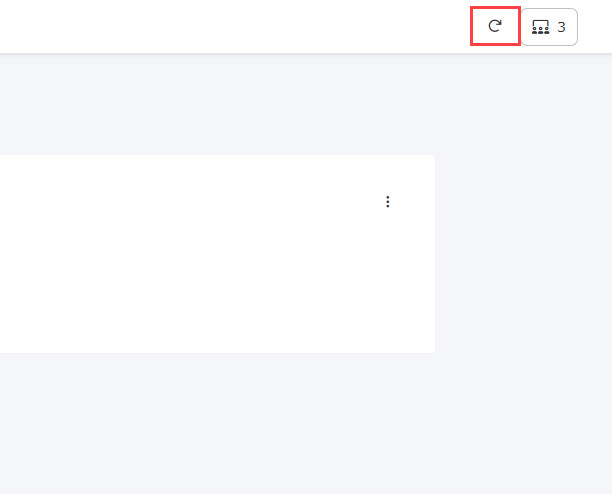
13. List of participants
The group icon in the upper right corner of the screen provides a list of channel participants.

Check grade details
On the "Grade List" tab of the Grade Control, click "Details" of the target grade to open the Grade Details screen.
Here you can check the details of the learner's performance.
(You will see new thread posts and reply thread posts made during a single study)

Deleted threads
When a thread is deleted by the learner himself/herself, the "Deleted" label and the deleted content will be displayed on the grade details screen.
*If the thread has been deleted by the administrator, it will not be displayed.
