Discussions
In discussions, learners can post their own opinions and reply to other learners' posts.
The administrator can see a list of learner submissions and replies, and the learner can also see them in the grade details screen.
In course design, group training can be implemented in addition to traditional individual study.
Creating Discussions
Discussions can be created on the Content Management page.
Required
Management role of Content manager (Edit)
01. Create a course
First, create a course in the Manage contents.
*For details on creating a course, refer to Course/Folder.
02. Open discussion creation form
Click on the course you created.
In the upper left corner of the screen, select "+ New" > "Teaching Materials" > "Discussion".
03. Settings
The following page will be displayed.
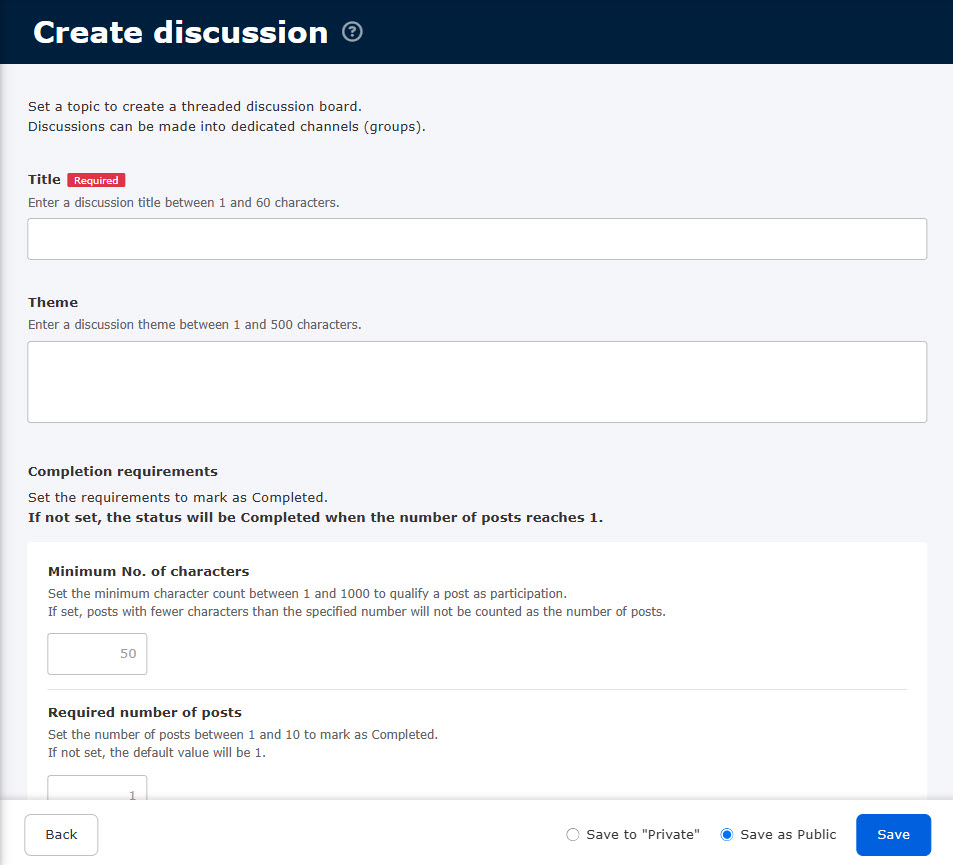
Fill in each item.
▼Title (Required)
Enter a discussion title.
▼ Theme
Please enter a discussion topic.
▼ Study Completion Requirements
You can set the conditions under which the learning status is determined to be "learning complete".
*If no special settings are made, learning will be completed when the number of submissions reaches "1".
- Minimum number of characters: You can set the minimum number of characters required to be considered as participating in a discussion, from 1 to 1000 characters.
- Number of Posts Required: You can set the number of posts required to complete the study, from 1 to 10. You can also choose whether to count thread replies as post counts. If you wish to count them, please tick the box.
- Number of thread replies required: You can set the number of thread replies required to complete the study, from 0 to 10.
▼ Display name
Select whether you want to display your "Full Name" or "Display Name" when posting.
When all settings are complete, select either "Save as Private/Save as Public" and click "Save".
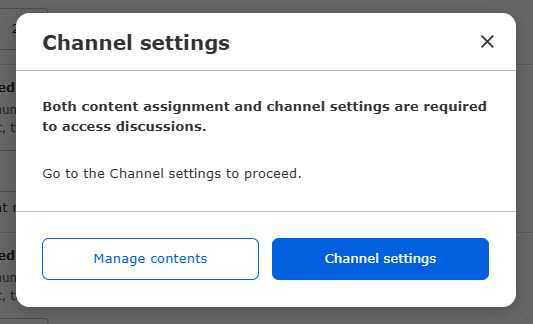
When creating a new channel, the following popup will appear if you have administrative rights to the channel.
To continue with the sorting, click on "Channel Settings".
To return to the Content Management screen, click on "Content Management.
04. Channel setting
Then, create a channel.
*For more details, refer to Channel Creation.
05. Content Allocation Settings
Set up content allocation in conjunction with channel settings.
*For more details, refer to Content allocation (operated by Content Management)(See "The following table shows the number of the "A" and "B" in the table below.
Edit Discussion
Select Manage contents in the side menu.
Right-click on the target discussion or select the "︙" icon > "Edit Discussion".
To edit the content, refer to Creating Discussions.
Discussion Channel List
You can create and edit channels.
*You must have one of the following administrative privileges to use this service.
- Management role of Content Manager (Edit/View + Assign)
- Content management editing/viewing privileges + grade management privileges
01. Open the Discussion Channel List (for administrator) screen.
Select Manage contents in the side menu.
Right-click on the target discussion or select the "︙" icon > "Discussion Channel List".
*For more information about the operation, please refer to "Discussion Channel List.
"Manage discussionsYou can also go to the "Discussion channel list (for administrators)" screen from the "Discussion channel list (for administrators)" screen. The administrative privileges required to do so are as follows
- Content assignment authority OR grade management editing/viewing/grading/grade approval authority
Learning Discussion
Learners select the discussion assigned to them from the Choose Course screen to study.
01.Open a discussion
Open the Select Course screen and click on the target discussion to open the following screen.
The title/theme/study completion conditions are displayed at the top of the screen.
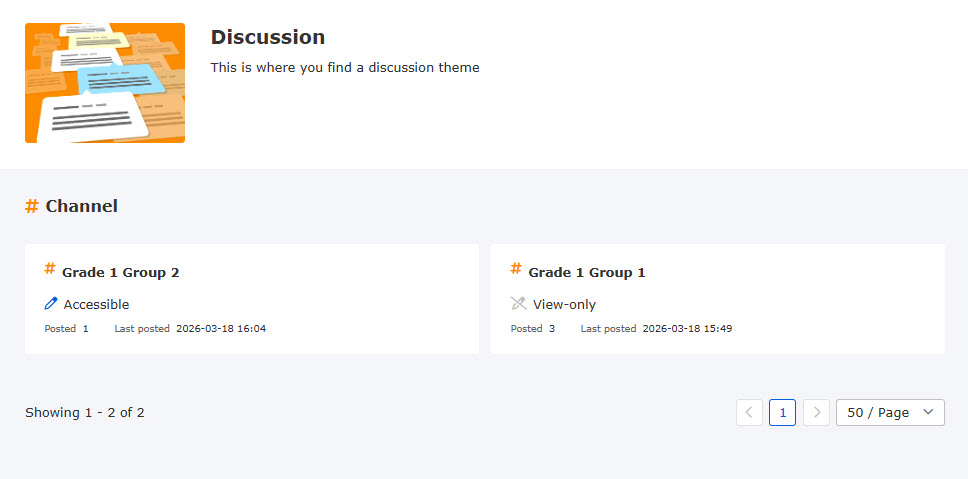
It also shows which of the channels set up for the discussion the operator can participate in and which can be viewed.
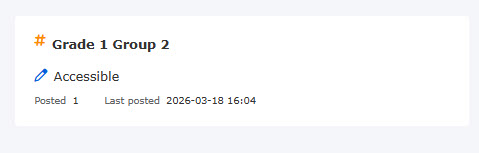
▼Channels available for participation
If you are a member of a channel group, you can join the channel and write to it.
▼View-only channel
You can only view the channel if you are not a member of the channel's group and are allowed to view off-channel learners.

02. Open channel screen
Click on each channel to display the channel screen.

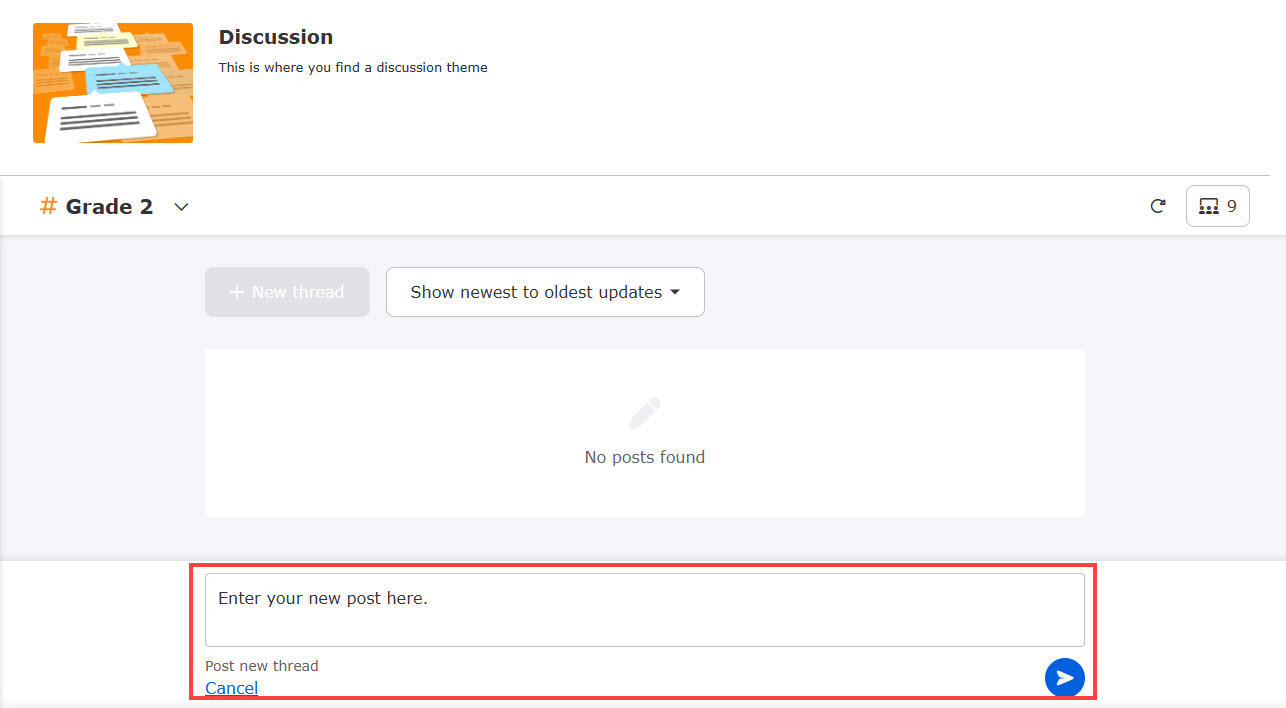
03. Create thread
A new thread can be created from "+New Thread".
To stop creation, click "Cancel.
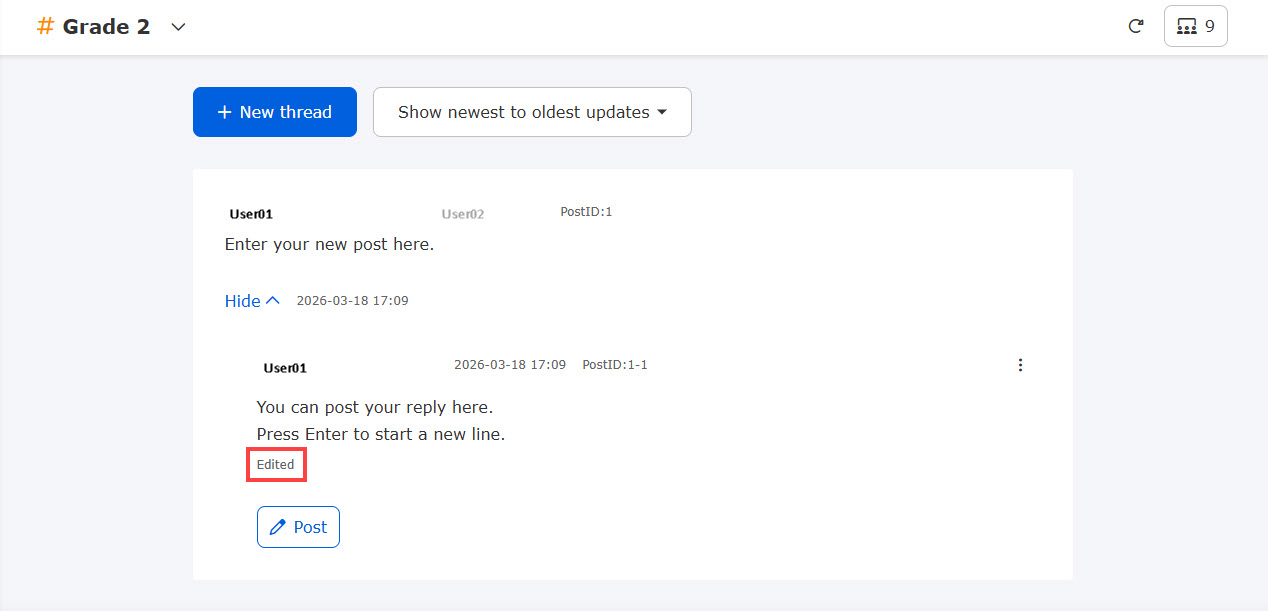
04. Reply to thread
You can reply to others' postings by clicking "Reply" or "0 replies".
To stop receiving replies, click on "Cancel".

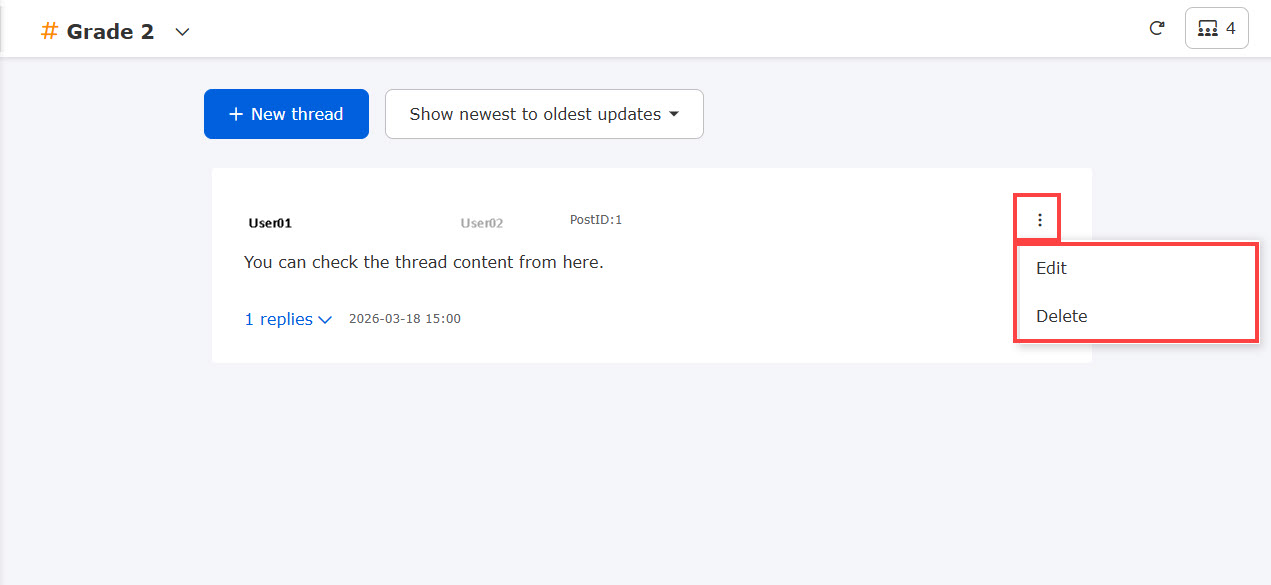
05. Edit/Delete threads
You can edit/delete your own threads and replies.
The "︙" icon > "Edit/Delete" is available for operation.
When a learner edits a thread, it is marked as "edited".
Deleted threads
If a learner deletes a thread, the channel will show the following

06. Reordering Threads
The pull-down menu at the top of the screen allows you to change the order of threads in the following three ways
- Threads listed in order of oldest to newest
- Threads are sorted by newest to oldest
- Displayed in order of update

07. update
The reload icon in the upper right corner of the screen allows you to refresh the thread list screen.

08. List of participants
The group icon in the upper right corner of the screen provides a list of channel participants.

09. Confirmation of Submission
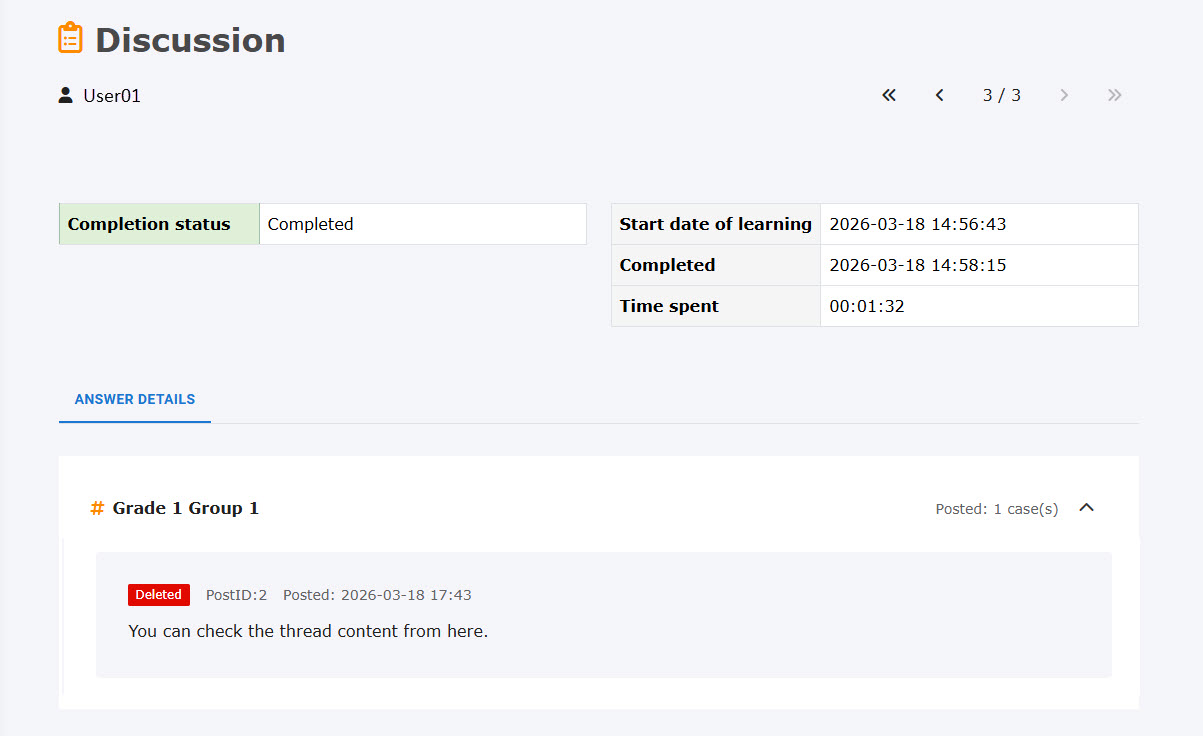
In the "My Grades" tab, which opens by clicking on "View Grades" in the side menu, click on "Details" of the target grade to open the grade details screen.
Here, learners can review their own contributions.
(You will see new thread posts and reply thread posts made during a single study)

Deleted threads
The learner's own grade details screen will show a "Deleted" label and the deleted content.
Discussion Management
The administrator can manage the created discussions.
*For more details, refer to Manage discussions.