Manage notifications
This page describes how to send notifications to users.
Depending on the purpose, they can be notified through an email or the notirication bar which is displayed on the top of the page.
Learners can access the list of notifications by clicking on the bell icon on the header.
*Select "Notifications" > "Manage notifications" from the side menu.
Required
Notification manager
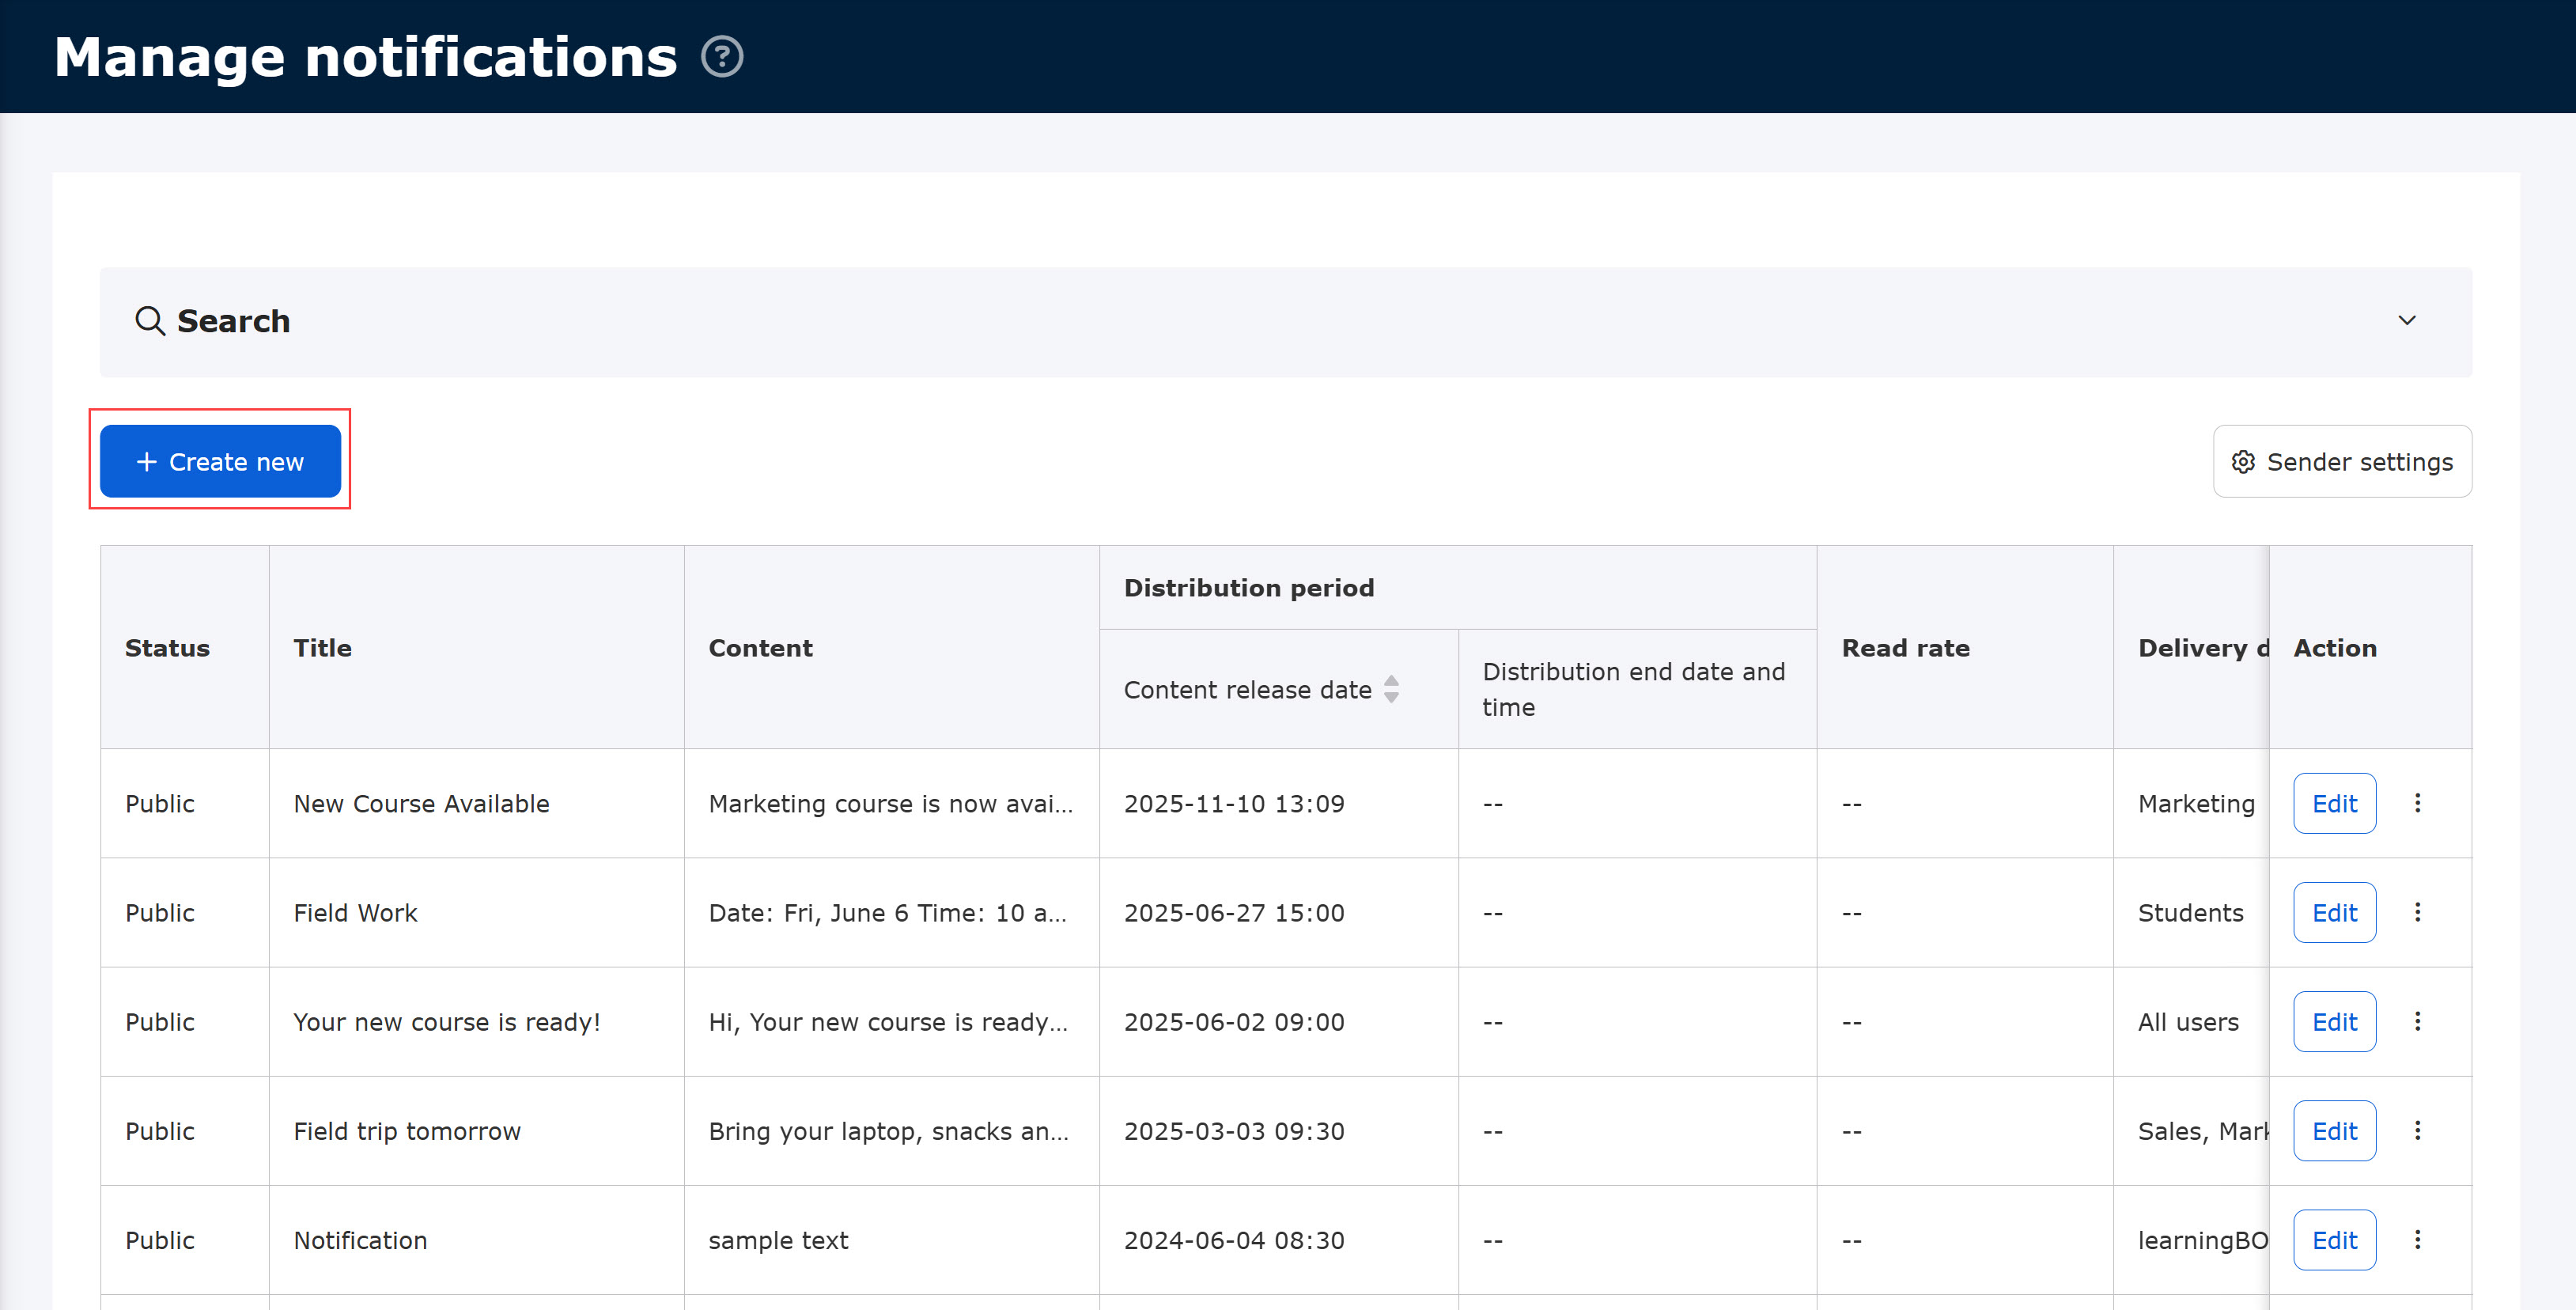
Create new notification
01. Create new
Click on + Create new in the Mange notifications.
02. Settings
The following page will be displayed.
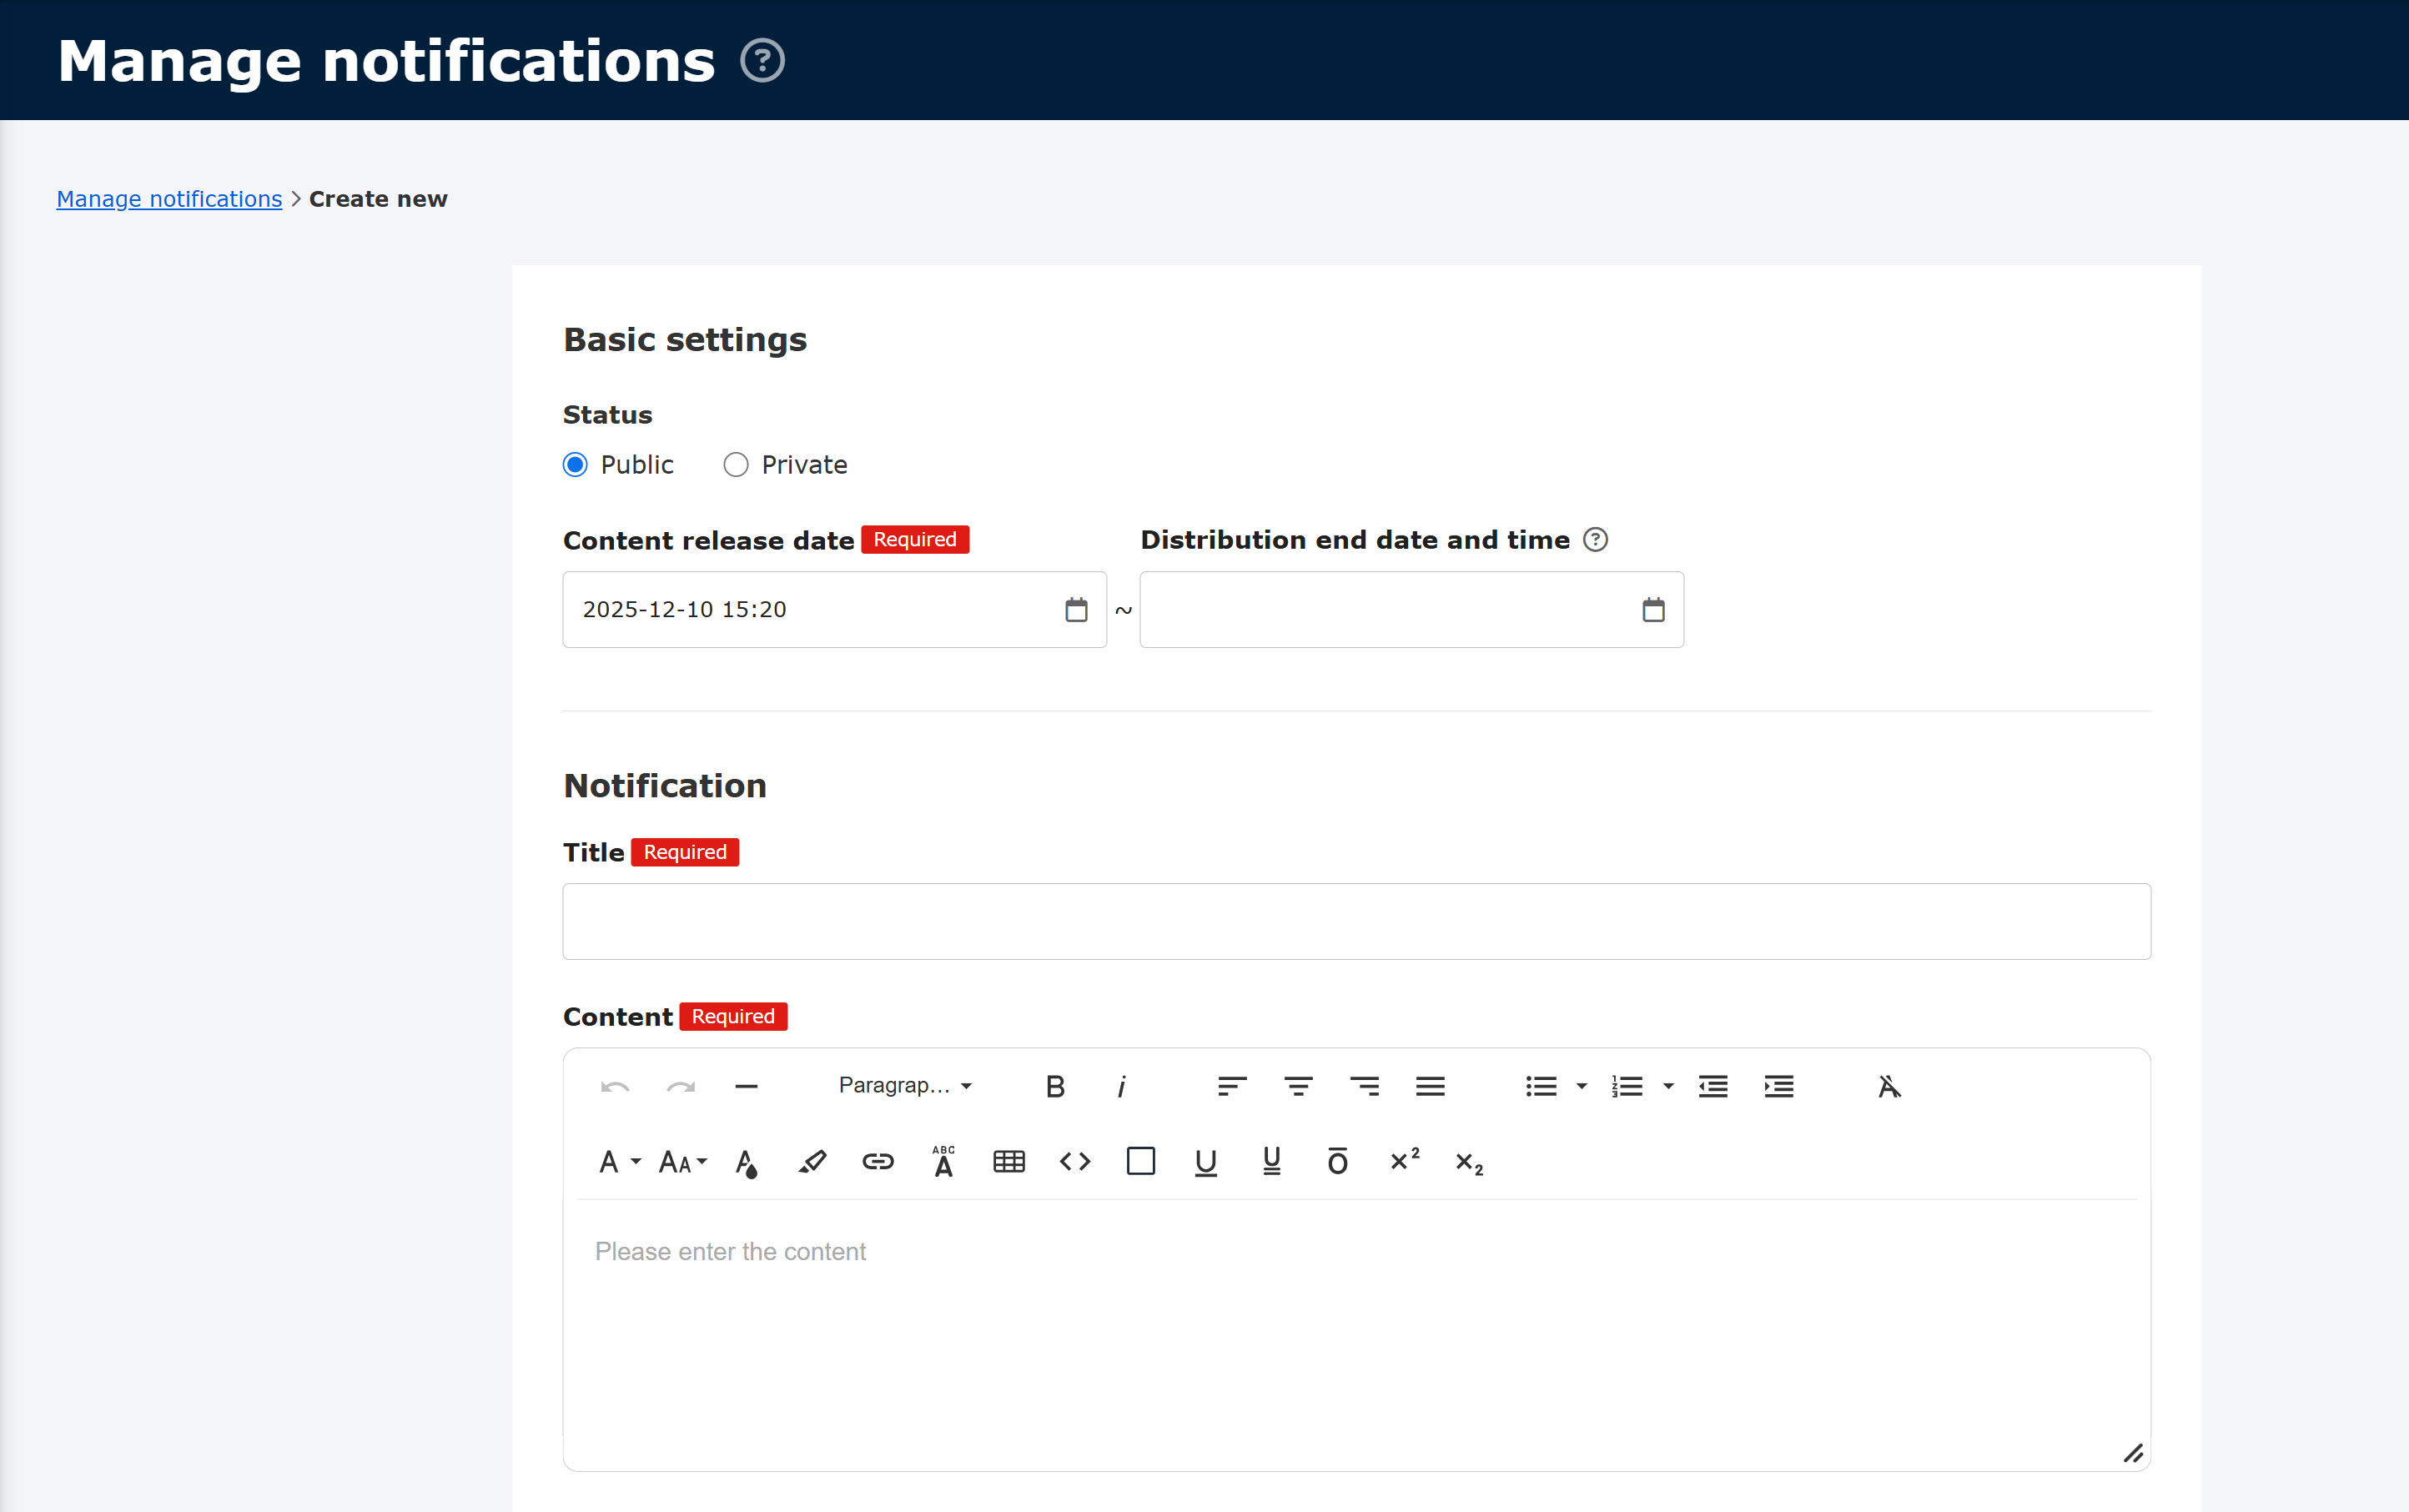
The following explains each item.
Basic settings
▼ Status
To display a notification you created, select "Public."
▼Start date/end date
Set the start and end dates to display the notification.
*Start date is mandatory.
Click on the blank space and select a date and time from the calendar.
If you do not set an end date, the notification will be posted indefinitely.
*After the set end date, the notification will be no longer displayed on the users' page.
Title/Contents
▼ Title
[Required] Enter a title for the notification.
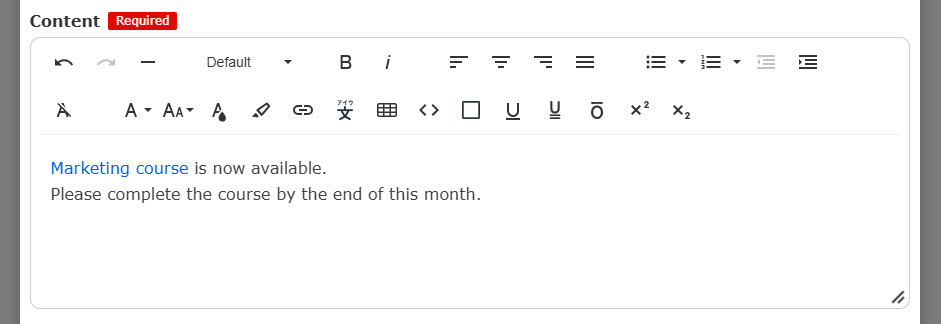
▼ Contents
[Required] Enter the content.
You can customize the content with a rich text editor, tables, links, etc.
Notifications are displayed in rich text format only on the Notification details page.
The following sections will be displayed in plain text format, containing only textual information.
- Notification bar
- Notifications on the Dashboard
- Notification email
- List of notifications on the Manage notifications page
- Notification page after clicking on the bell icon on the top
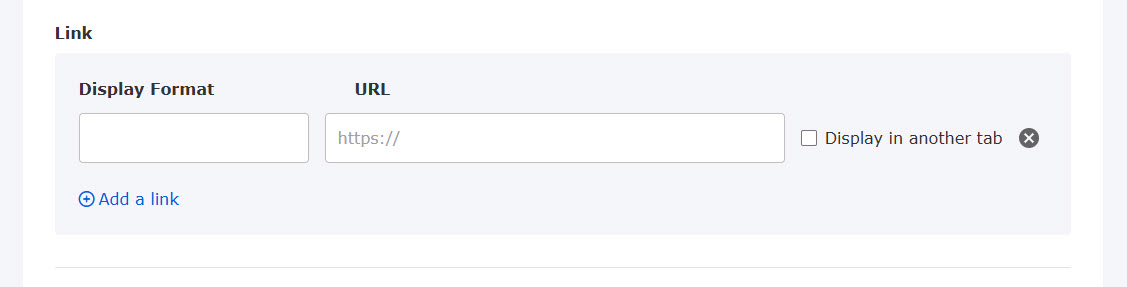
▼ Link
You can insert links in the content.
Enter the text to be displayed in the Display format.
Enter the URL in the URL field.
If you wish to open the link in a separate tab, tick the box.
Click on "+Add link" to add a link, or click on the X button to remove it.
Destination
[Required] Select the recipients to whom you would like to send notifications.
Select All users or groups.
For groups, tick the group(s).
- You cannot send the notification to users who do not belong to the selected group(s).
- If you create a group after creating the notification, it will not be sent unless you add the group to the destination.
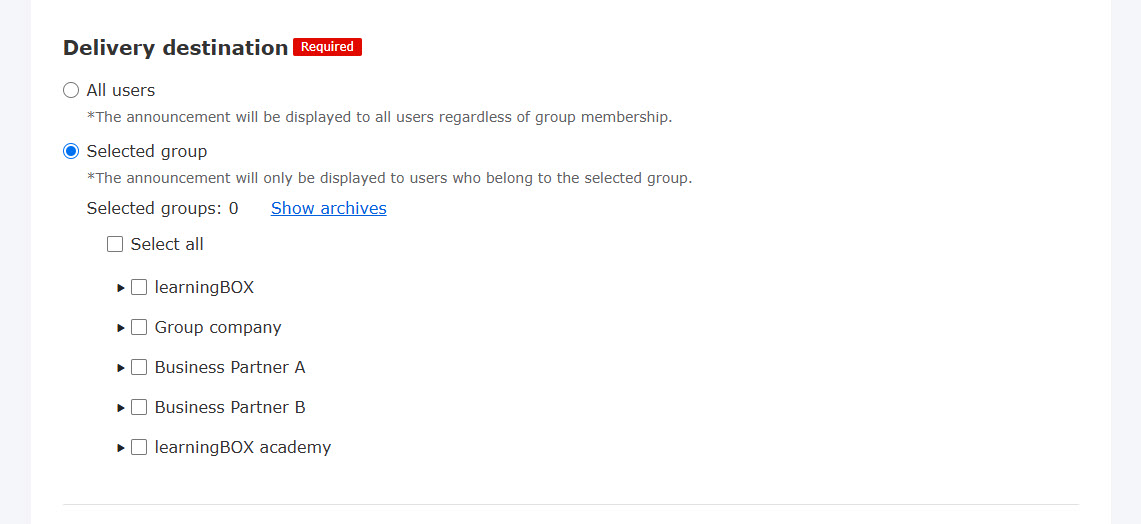
Show archives
You can display archived groups in the list of destinations.
Click Show/Hide archives.
*To select all groups including archived ones, click on Show archives.
If you archive a group that has been selected as destination, the notification will be sent.
Notificaiton sender
You can set a sender of the notification.
*The interface will vary depending on the settings on the Sender settings.
The sender selected in the Notification sender will be displayed.
If you select a sender in the Sender settings, the operator's value will be displayed in the Display text.
To edit the text to display, select Enable editing in the Sender settings.

Notification settings
The following two items can be set:
▼Show notification bar
A notification bar can be displayed at the top of the learningBOX page.
To display a notification bar, tick the box.
▼ Email notification when notification distribution begins.
Users can be notified by email.
Tick the box to activate this function.
*For more details on how to edit email templates, refer to Email settings by admin, Notification section.
▼ Notify this email as important
You can send an email to all users as important.
*For more details, refer to Individual e-mail notification settings.
Save the settings.
03. List of notifications
Created notications will be listed on the Manage notifications.

Click the number displayed next to the bar graph to view Recipients to check who has read or unread.
To check the read rate of notifications created before Ver. 4.0, click "Edit" on a notification and save the settings.
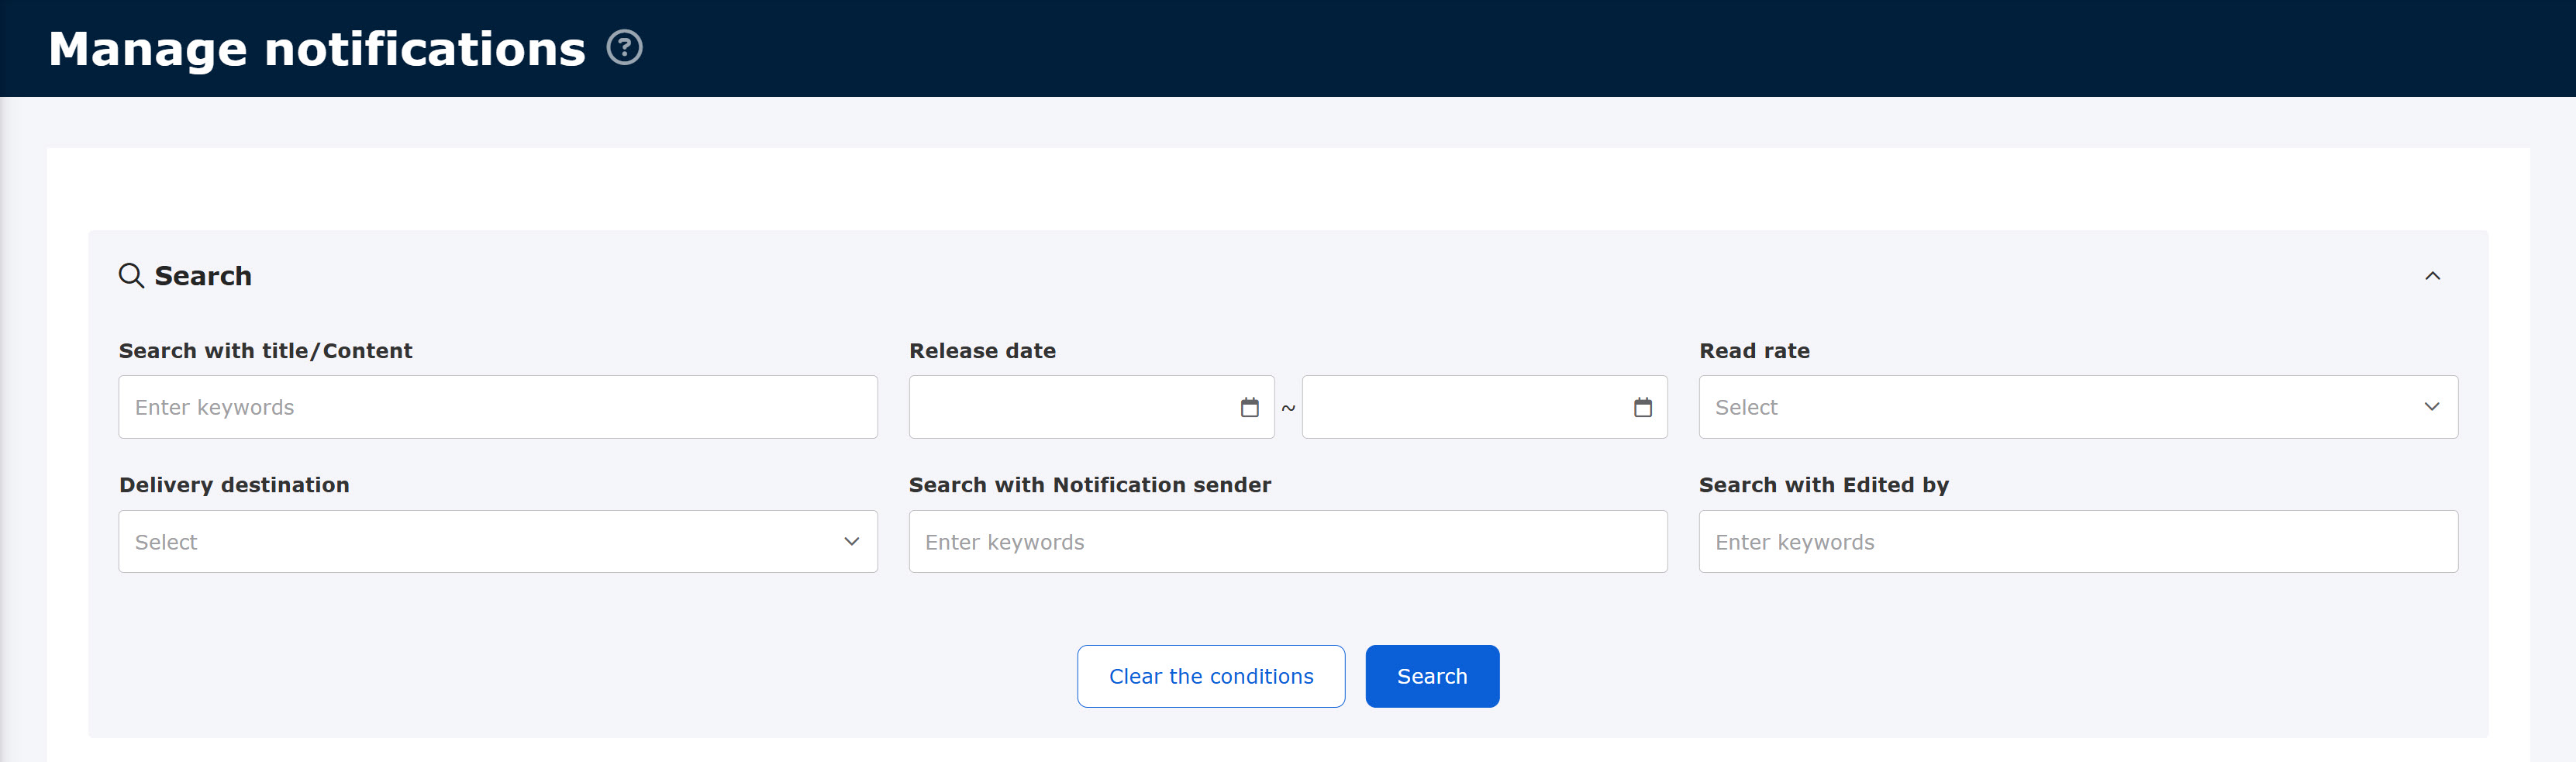
04. Search
The search field helps you sort notifications.
Title/content, release date, read rate and other criteria are selectable.
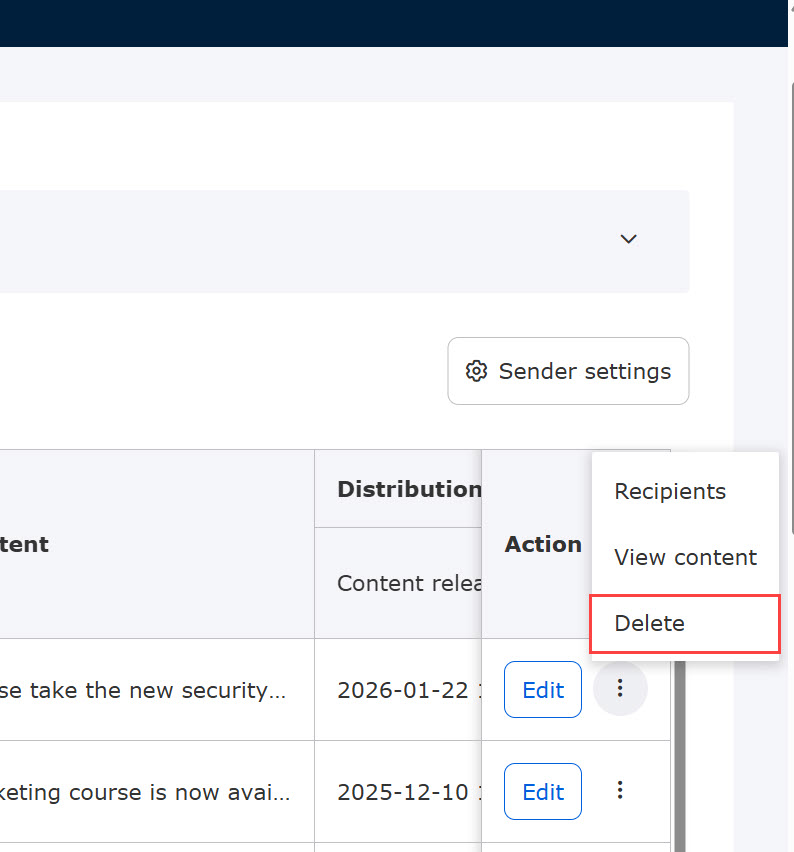
Edit/Delete
01. Edit notification
You can edit the created notifications.
Click on Edit.
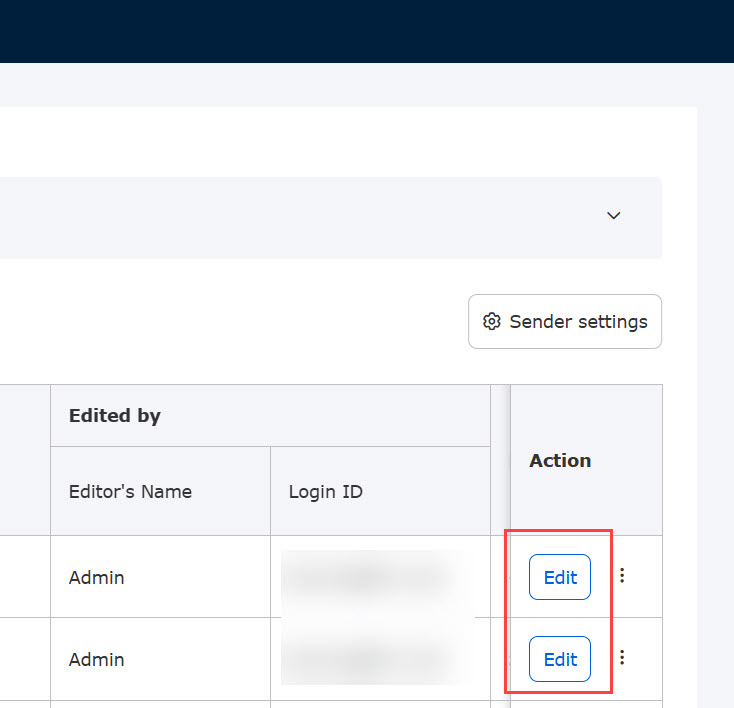
To find how to edit the items, refer to Create new notification.
Save the settings.
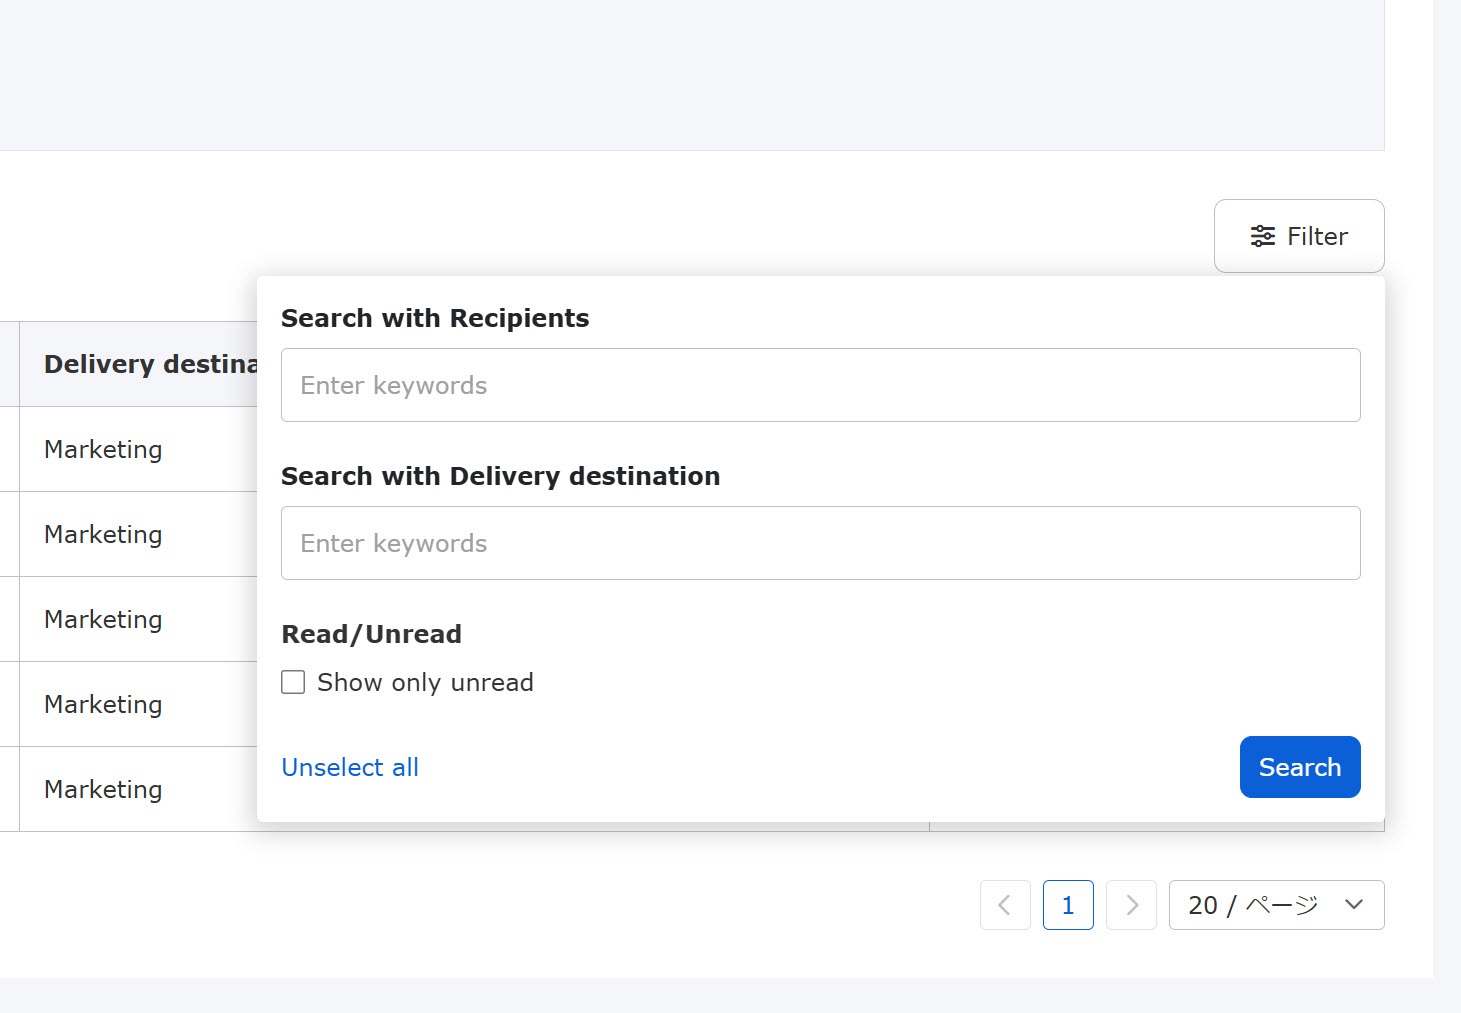
02. Recipients
Recipients for a notification will be automatically listed.
Click the "︙" icon on a notification > Recipients

The following page will be displayed.
It shows you the recipients and the read status of the notification.
To view the content of the notification, click on the View content under the title.
Only users with a status of “Active” will be displayed.

To filter notifications, click on the "Filter" on the right side of the page.
Enter keywords in the windows.
If you want to filter only unread users, tick the box.
Click "Notify unread users" on the left side of the page, and the following pop-up will appear.
After setting each item, click "Notification."
▼Send now
You can send emails to unread users.
Tick the box to activate this function.
The following items can also be set:
・Add "For Unread recipients" to email title
Selecting this item will add "For Unread recipients" to the email title.
・Notify this email as important
This item enables you to send the email to all users as an important notice.
*For more details, refer to Individual e-mail notification settings.
▼Show notification bar
A notification bar will be displayed to unread users.
Tick the box to activate this function.

To send an email to unread users, the notification status must be "Public" and be within the access period.
03. View content
You can view created notifications.
Click on the "︙" icon > View content

04. Delete notifications
You can delete created notifications.
Click the "︙" icon > Delete
Sender settings
You can set a sender to display.
Required
Management role of Notification manager (All users) + Co-admin
Click on the Sender settings.

The following window will be displayed.
Select the sender to display.
You can select a sender from the following items in the Input field settings.
- Department
- Name
- Display name
- Department Name
- Fields added in the Input field settings (*Only those with a text/radio button/pull-down input format)
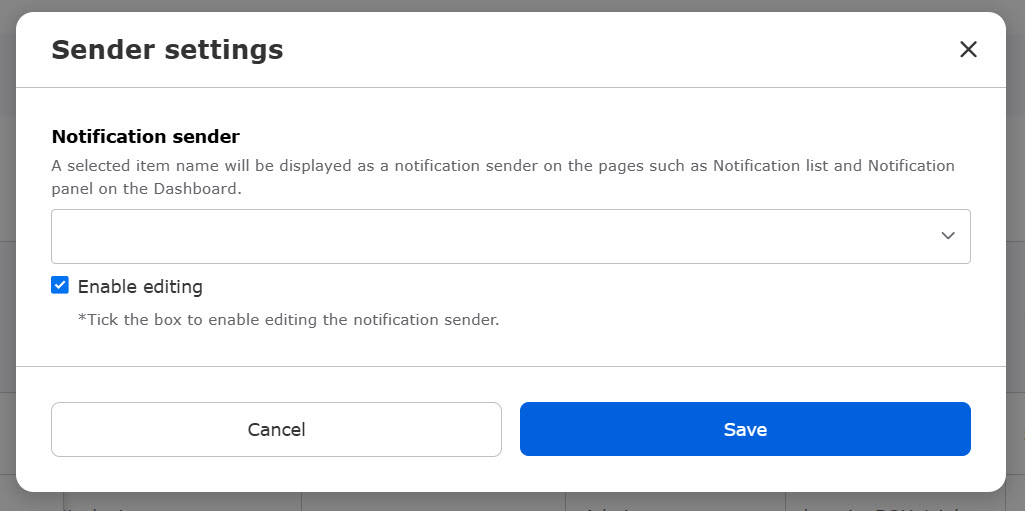
You can allow or disallow to edit the value of the sender.
Tick "Enable editing" to allow edit the sender.
Once the sender is set, it will be displayed in the following places:
- Notifications on the Dashboard
- Notifications page
- Manage notifications
- Notification details
- Notification email
A sender set in the Sender settings takes precendence over the settings, Change sender email address in the Site customizer.
Note
You can add a sender to the body of an email in the notification template.
*For more details, refer to Email settings by admin.
Display notification
The following explain the user interface of each notification.
A notification will be marked as read when:
- the notification in the notification bar is closed with the ✕ button
- notification details are displayed
- "Mark all as read" is clicked on the Notification page
▼Dashboard
The sender will be displayed on the Notification panel on the Dashboard as follows.
Unread notifications will display a red dot as an unread indicator.
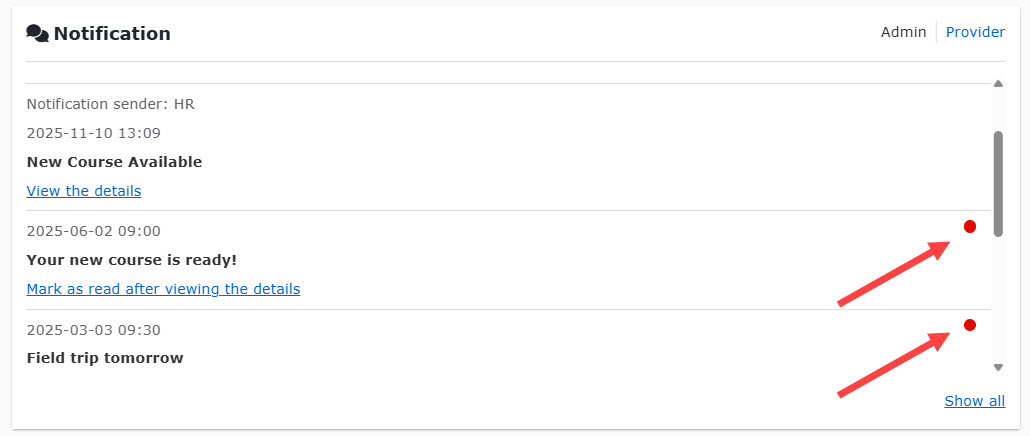
Click on "View details" to find the details.
After the confirmation, the status will be Read.
Clicking "Show all" navigates you to the page of Notifications.
▼ Notification bar
A notification bar will be displayed at the top of the screen.
*The notification bar does not display the sender or the red dot unread indicator.
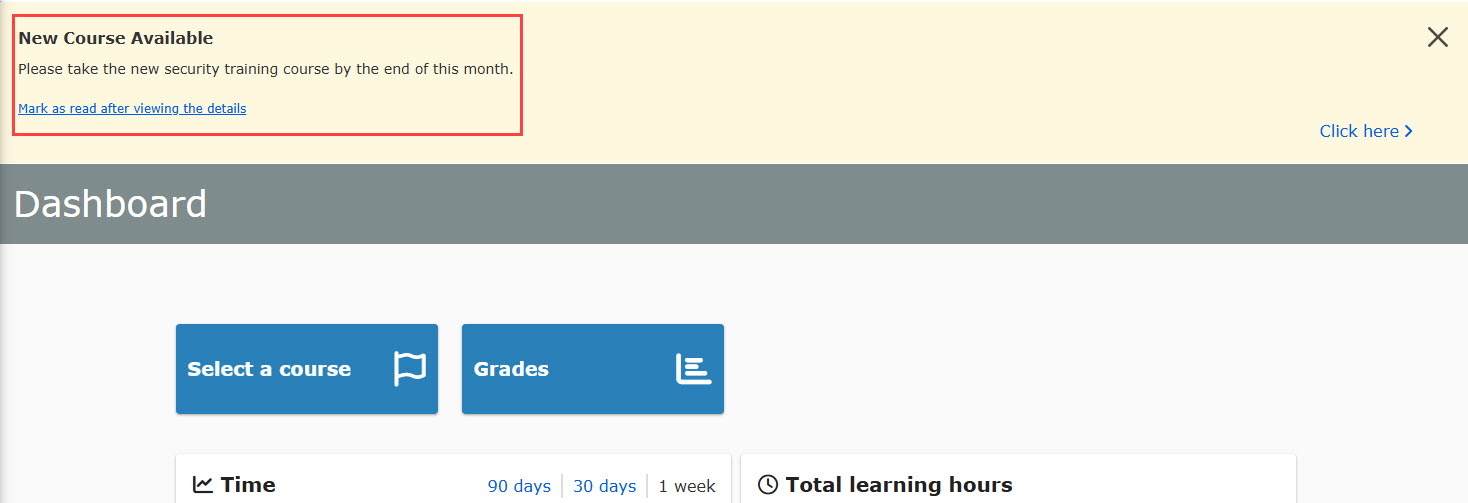
Click on "Mark as read after logging in and viewing the details" for each notice to see the details of the notice.
Closing the notification bar with the ✕ button or viewing the notification details will mark the notification as read.
When you view the details of a notification or click the "Mark all as read" button on the Notifications, the notification bar for that notification will be automatically removed.
When a notification from the provider (learningBOX) is open, it will be displayed on the notification bar before login.
To view the details of the notification, please log in to learningBOX.
*Clicking on "Confirm content and mark as read after login" will bring up the login page.
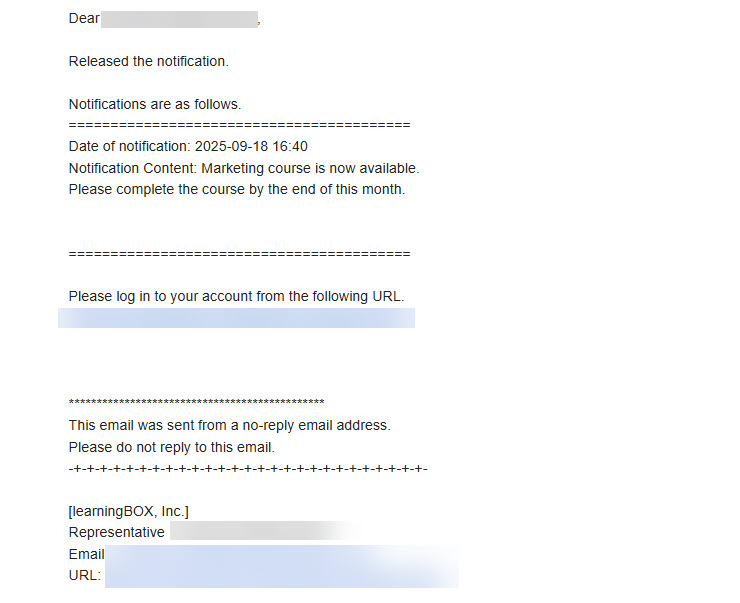
▼ Email
Notifications will be sent to registered e-mail address.
To view the content, click on the URL in the e-mail.
Notification page
Click the bell icon in the header menu.
Notifications will be listed in a panel.
*Sorting order is based on the latest delivery date.
Unread notifications will display a bell icon and a red dot unread indicator in the notification panel.
If you subscribed the Customization option prior to September 17, 2025, you will be able to use this function by adding the menu in the Manage menu page within the Site customizer.

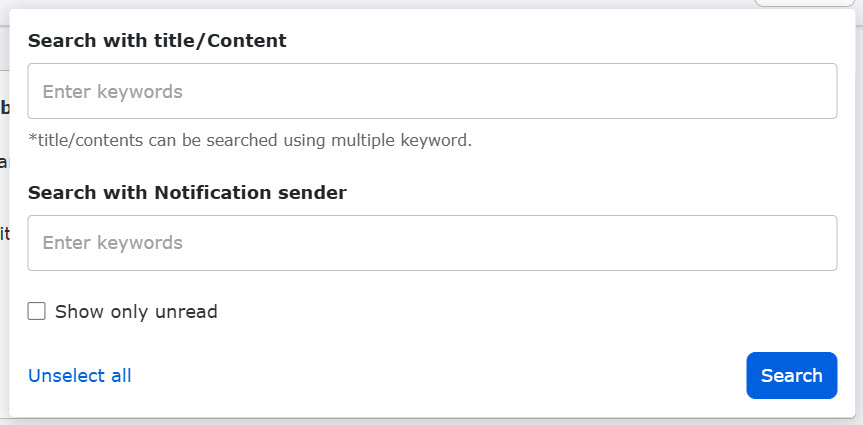
Filter
Filter button helps you find specific notifications.
The followig page will be displayed.
Enter keywords in the search bars.
*Multiple keywords are available in the title/content.
Enter up to 100 characters, separated by spaces.
To search unread notifications, tick "Show only unread."
Mark all as read
You can mark all notifications as read.
Click "Mark all as read" in the pop-up memu.

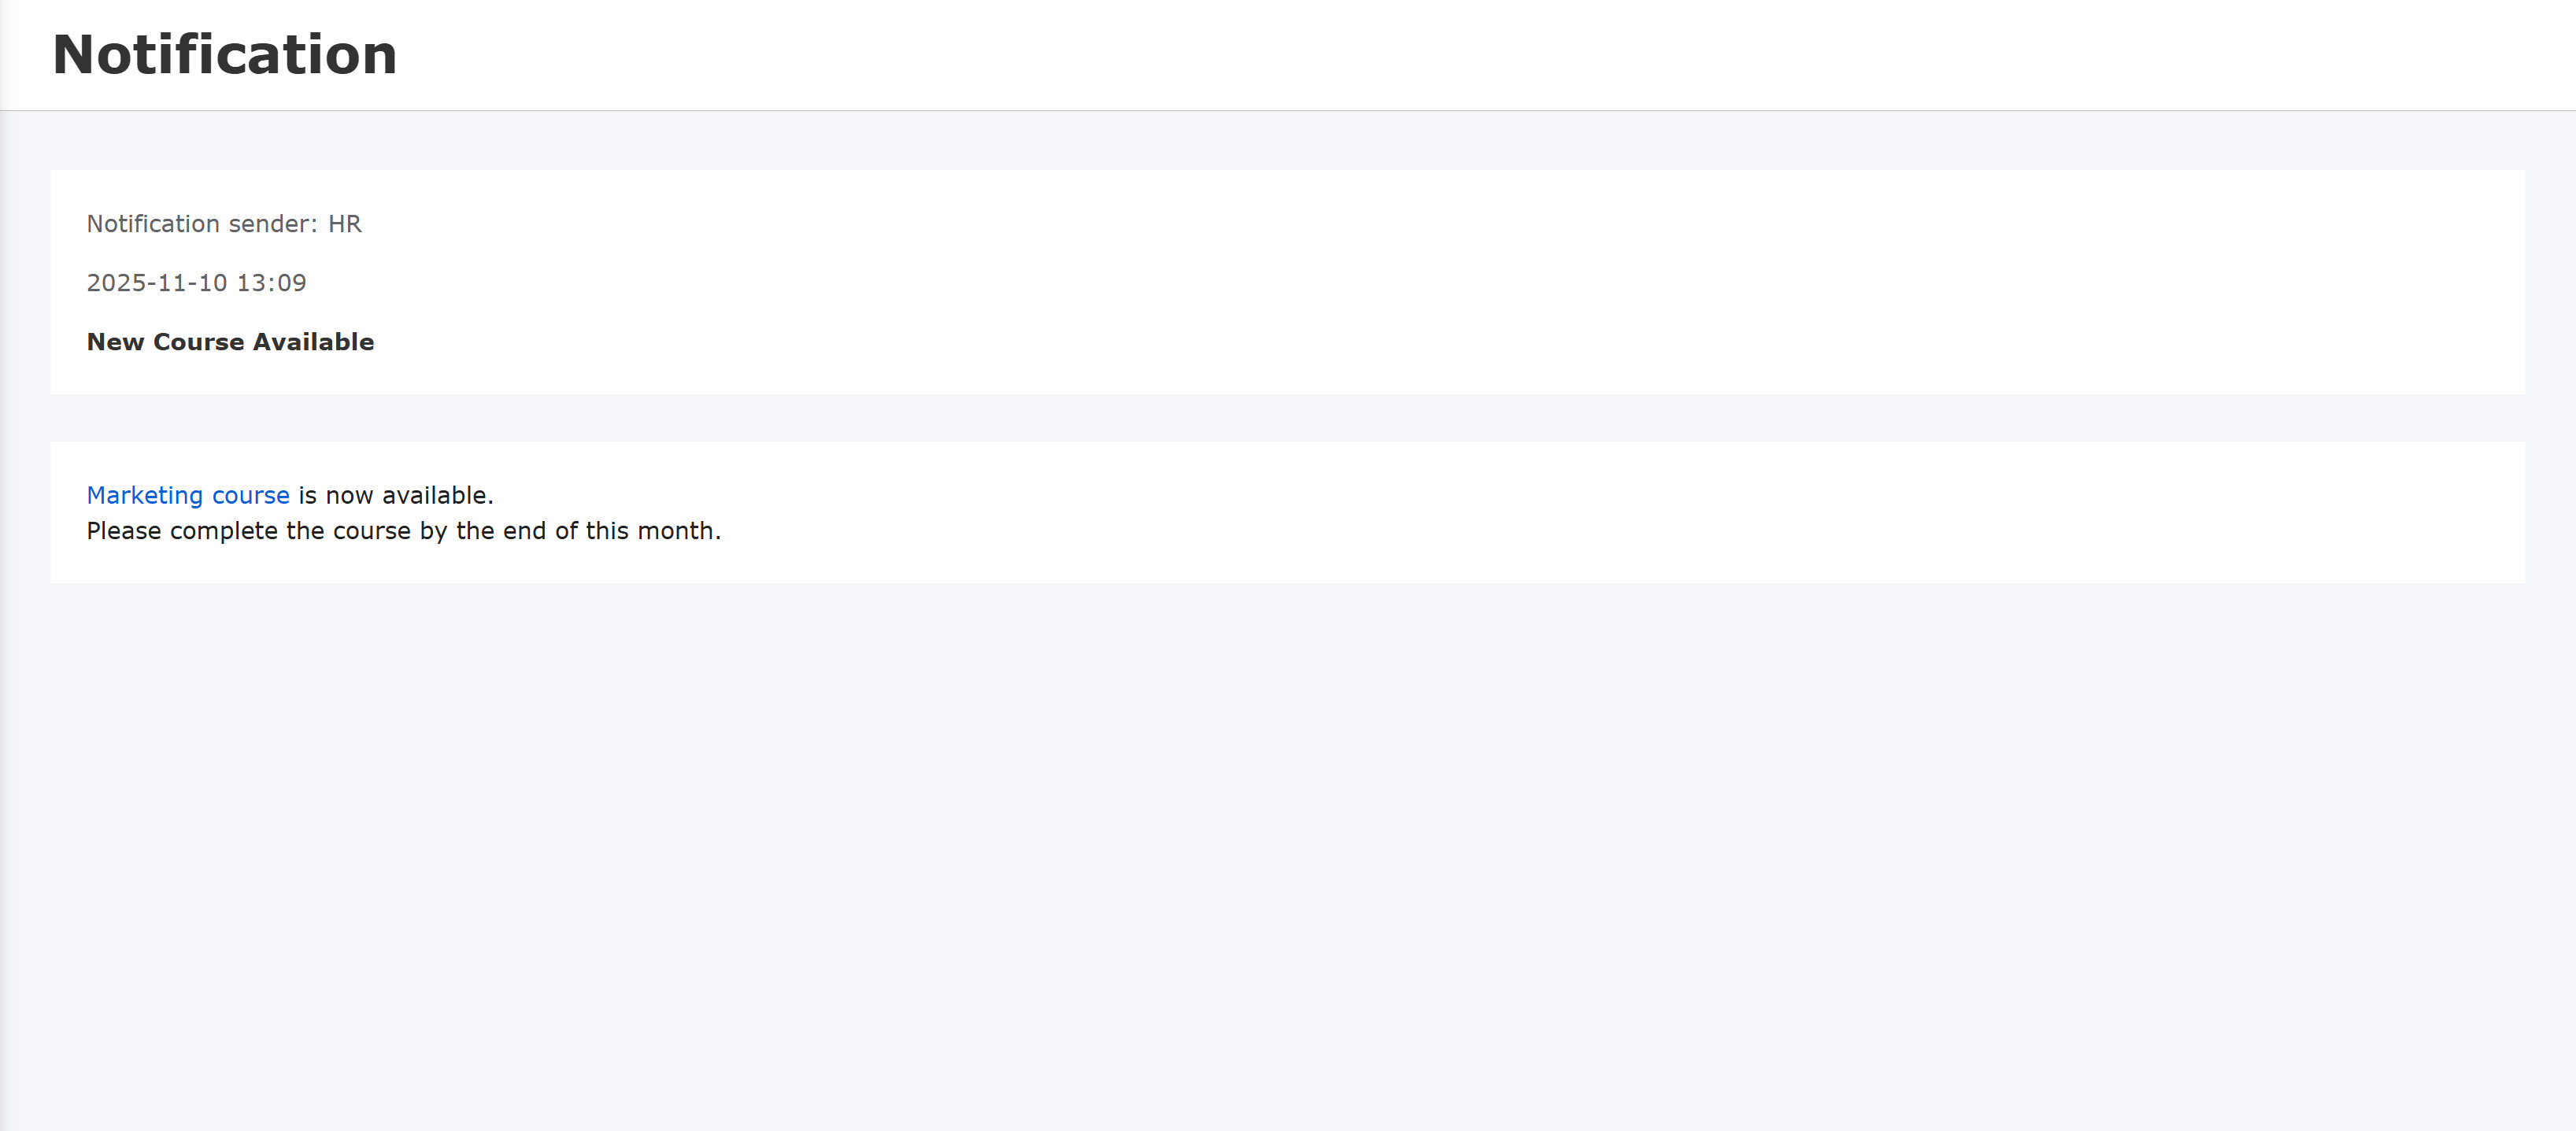
Notification detail
Click "Check contents" for notices you have already read, or "Check contents and mark as read" for unread notices, and the details of the notices will be displayed as shown below.
Note that unread notices will be marked as read when you check the details of the notice.
Click on Back to go back to the list of notifications.

The following notifications will not be displayed on the Notification page:
- Deleted notifications
- Private notifications
- Expired notifications
The description of read/unread notifications is displayed at the top of the notification details.
The description will never be displayed when you close it with the X button or collapse the frame of the read/unread description in the Notification page.