Email automation
The following explain email automation on the Email settings page.
Password expiration
The user will be notified prior to the expiry date of the password.
*For more details about the expiry date, refer to Add user.
01. Edit template
You can edit the email template for the password expiration.

▼ Edit
1. Click on a list icon.
2. Click on the pencil icon.
*To restore the edited template to the default, click on the vortex icon.

(2) For approximate operating instructions, please refer to the "Email settings by adminPlease refer to the "Invitation Email Notification" in the "Invitation Email Notification" section as it is the same as the "Invitation Email Notification" section.
Click on Save to complete the settings.
Message receipt on Message box
The recipient is notified when a message is received.
*For more details, refer to Message box.
01. Settings
You can select whether recipients are notified or not when a message is sent.
Turn on the toggle key to use this function.

02. Edit template
You can edit the email template for message box receipt notifications.

▼ Edit
1. Click on a list icon.
2. Click on the pencil icon.
*To restore the edited template to the default, click on the vortex icon.

(2) For approximate operating instructions, please refer to the "Email settings by adminPlease refer to the "Invitation Email Notification" in the "Invitation Email Notification" section as it is the same as the "Invitation Email Notification" section.
Click on Save to complete the settings.
Message receipt on Direct message
The recipient is notified when a direct message is received.
*For more details, refer to Direct message.
01. Settings
Go to "Email settings" > "Message receipt on Direct message"

Select whether or not to notify users when a direct message is sent.
Turn on the toggle key to use this function.
02. Edit template
You can edit the email template.

▼ Edit
1. Click on a list icon.
2. Click on the pencil icon.
*To restore the edited template to the default, click on the vortex icon.

(2) For approximate operating instructions, please refer to the "Email settings by adminPlease refer to the "Invitation Email Notification" in the "Invitation Email Notification" section as it is the same as the "Invitation Email Notification" section.
Click on Save to complete the settings.
Action request
When there is a submission to grade, a notification can be sent to Admin on a specific day or date.
*For more details, refer to Grading status.
01. Settings
Click on the Advanced settings.

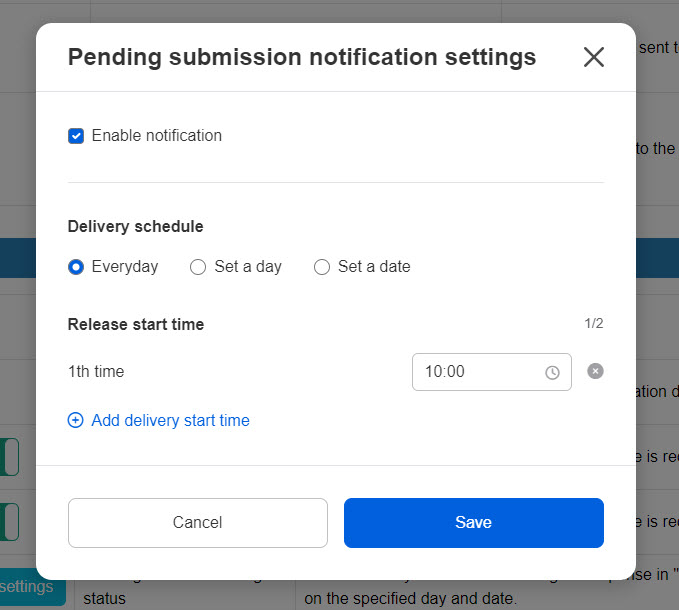
The following window will be displayed.
1. Tick the box to use this function.
2. Schedule the date to notify.
3. Specify the time to send the notification.
4. Click Add to add the time, or x to delete it.
5. Save the settings.

02. Edit template
You can edit the email template.

▼ Edit
1. Click on a list icon.
2. Click on the pencil icon.
*To restore the edited template to the default, click on the vortex icon.

(2) For approximate operating instructions, please refer to the "Email settings by adminPlease refer to the "Invitation Email Notification" in the "Invitation Email Notification" section as it is the same as the "Invitation Email Notification" section.
Click on Save to complete the settings.