
By contents
You can check the results of all users by content, and filter results by duration, group or other criteria.
*For more details, refer to Management roles.
Required
Management role of Grade manager (Edit/View)
Content list
01. Go to Manage grades
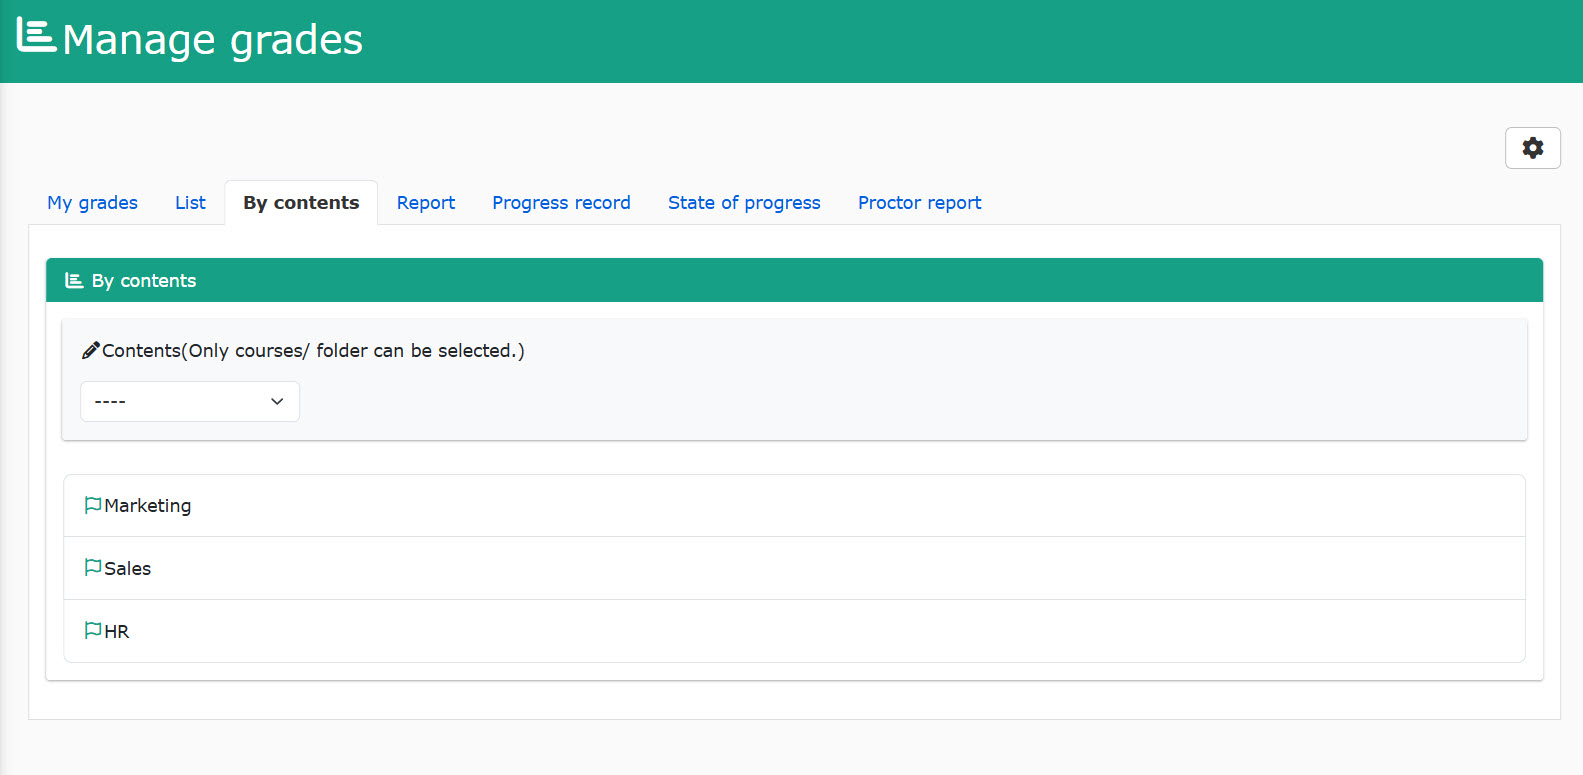
Click on the "By content" tab on the Manage grades page.
*You can access the same page from "Manage grades" > "By Content" in the side menu.
02. List of content
The assigned courses will be listed.
Click on each course to view the folders and contents within the course.
You can search courses and folders from the list.
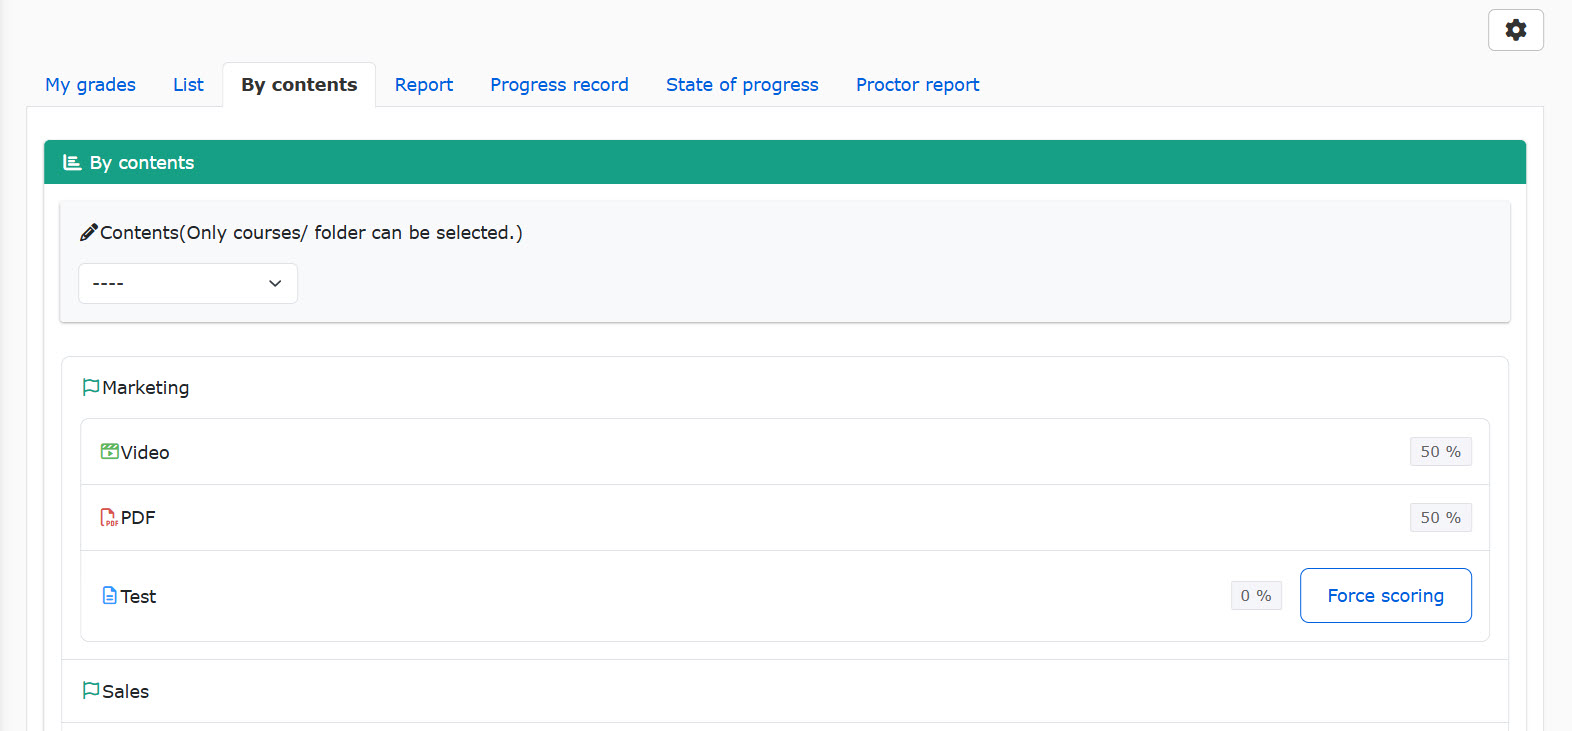
03. Completion status
Each percentage shows the completion rate of each content.
Content details
Click on a content to see the result details.
*For Quiz/exams, questionnaires, personality tests, two tabs will be displayed: "Summary and details" and "Scores." For other contents, only the content of Scores will be displayed.

Summary and details
This tab has three sections: Sumamry by user, Answer details and Operation logs.
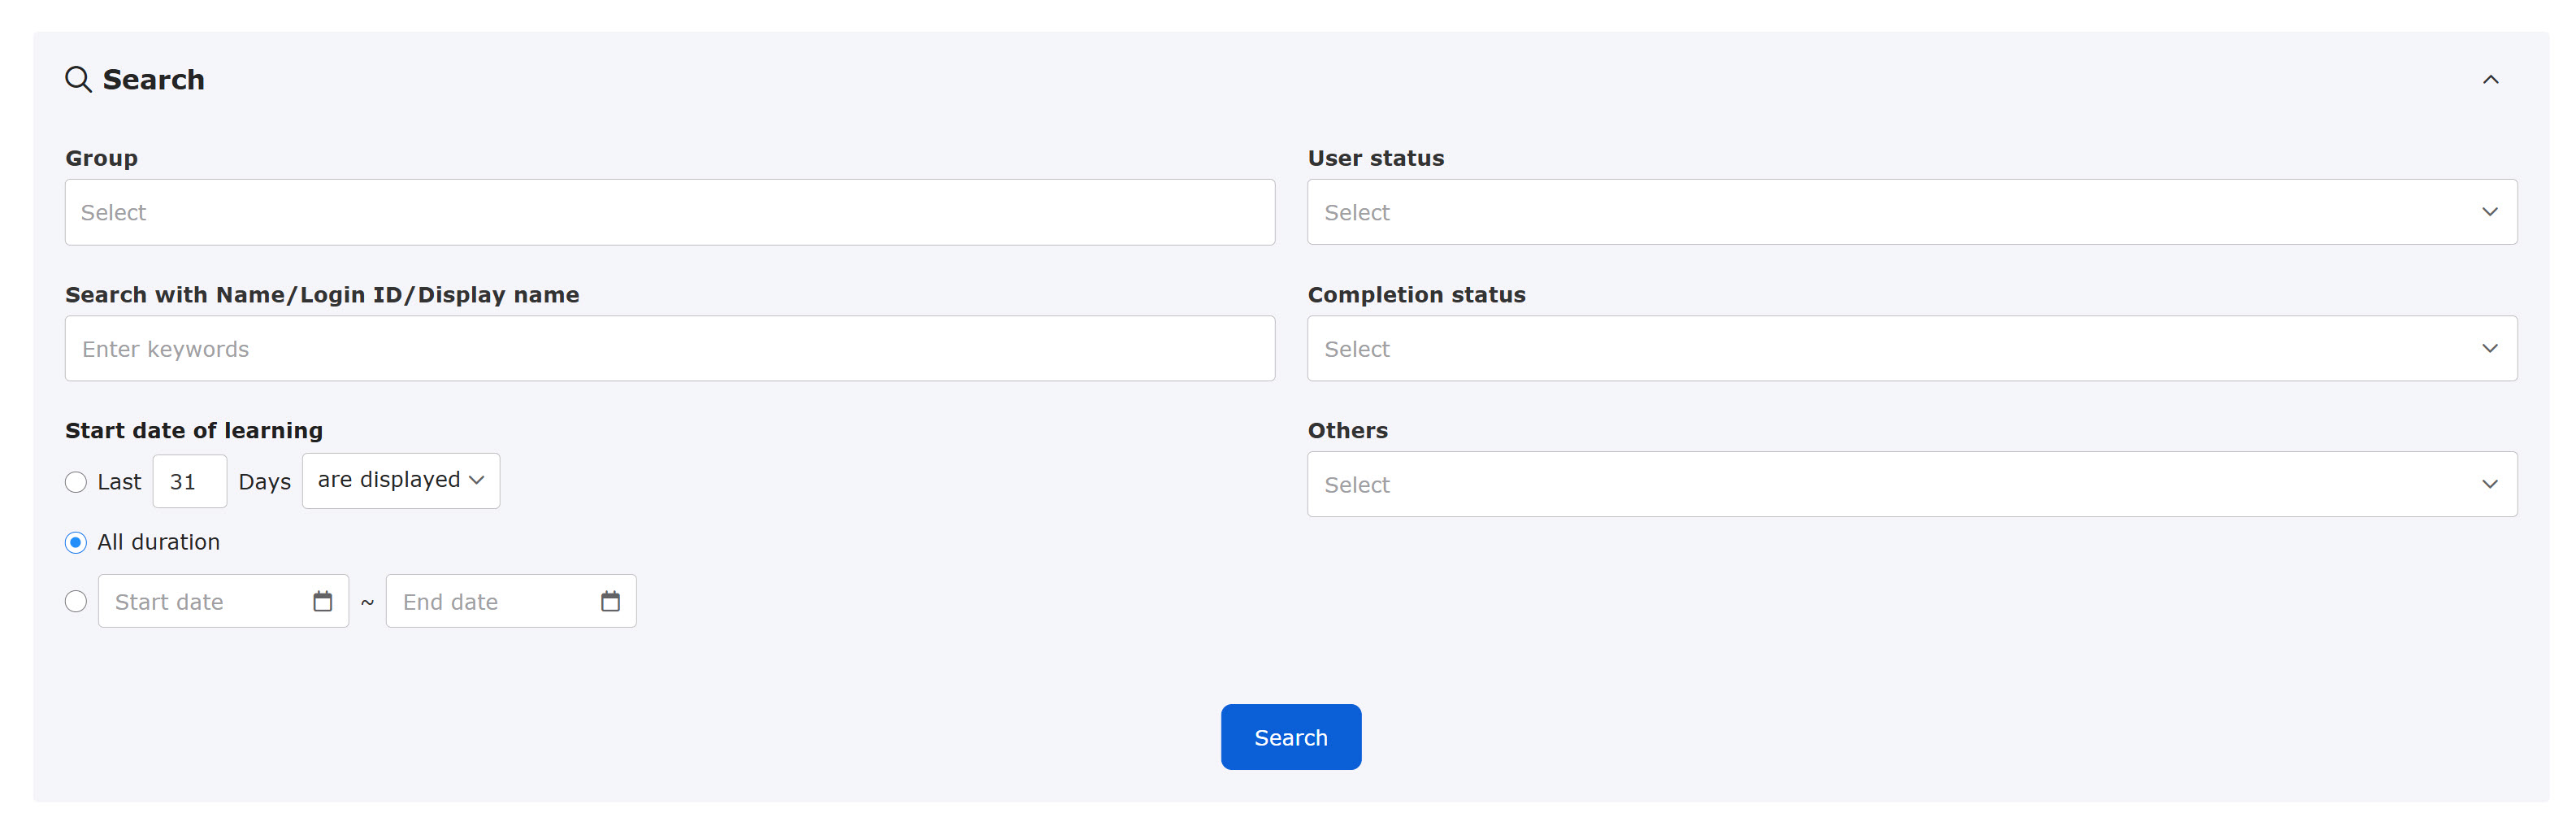
01. Search
To specify the results, selec the criteria.
*In the "Others" section, the highest or latest scores can be selected.
02. Results
The specified results will be listed.
The following sections will show the details in each tab.
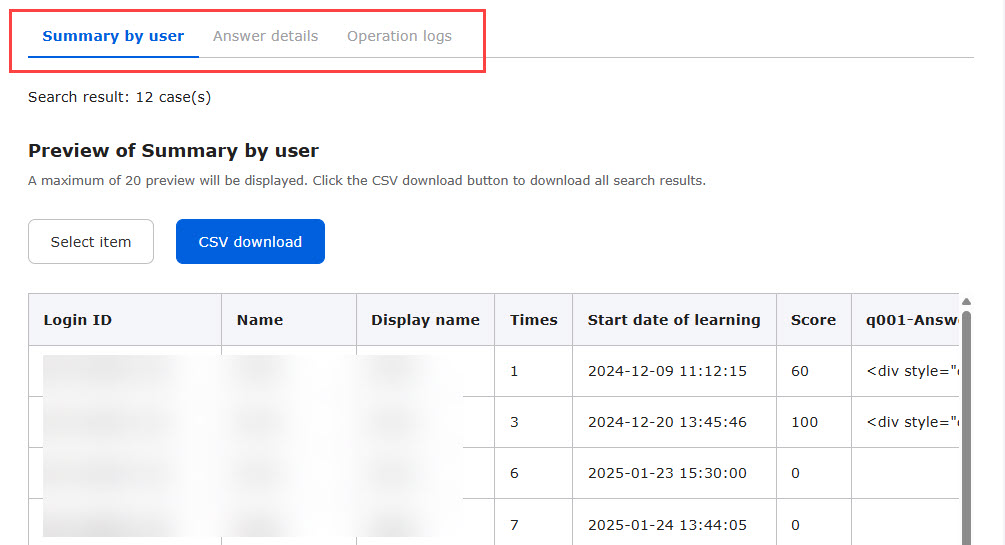
▼ Summary by user
Answers by each learner will be displayed.
▼ Answer details
Submitted answers, time spent and more details will be displayed.
▼ Operation logs
Operations by learners will be displayed per question.
*For questionnaires, only the "Summary by user" and "Answer details" tabs will be displayed.
03. Select display items
Items regarding grades can be selected to show in the content page and a CSV file.
Click "Select item."
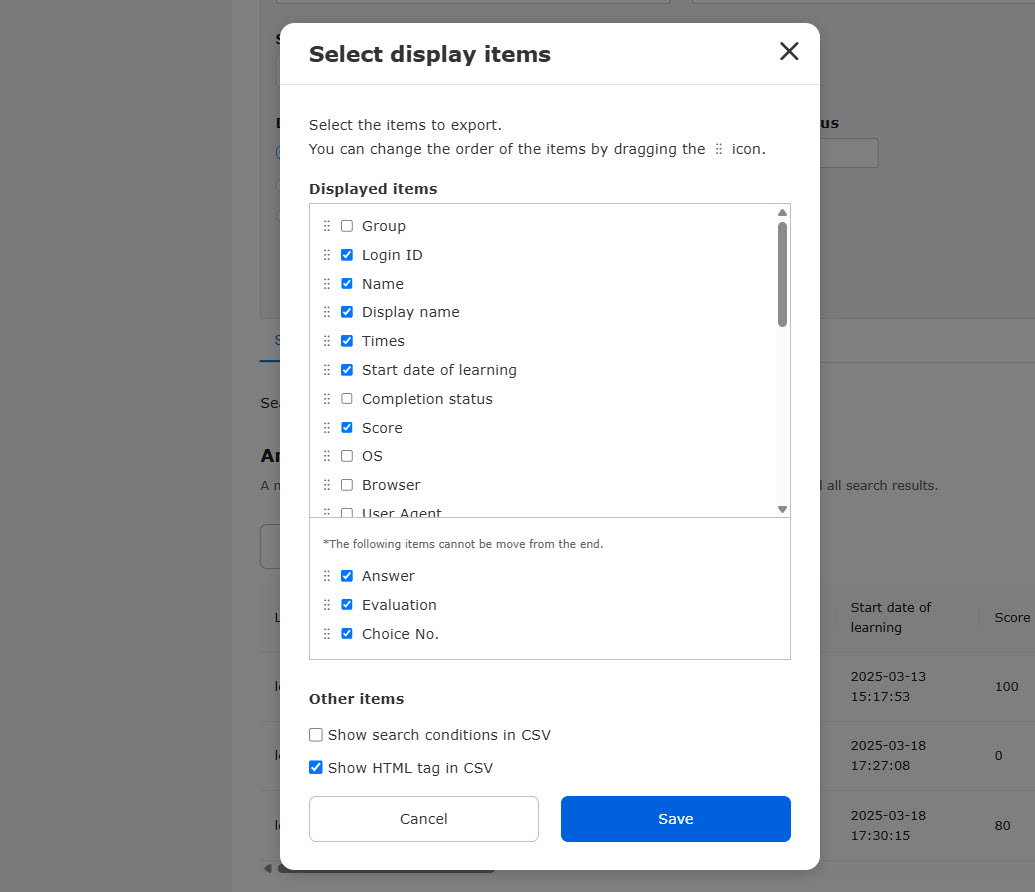
▼ Display items
Tick the box next to any item you want to display.
To change the order, drag and drop the item.
▼Other items
The following two settings are available.
Tick to the box(es) if necessary.
- Display search criteria in CSV format
- Display HTML tags in CSV
Save your changes once all settings are complete.
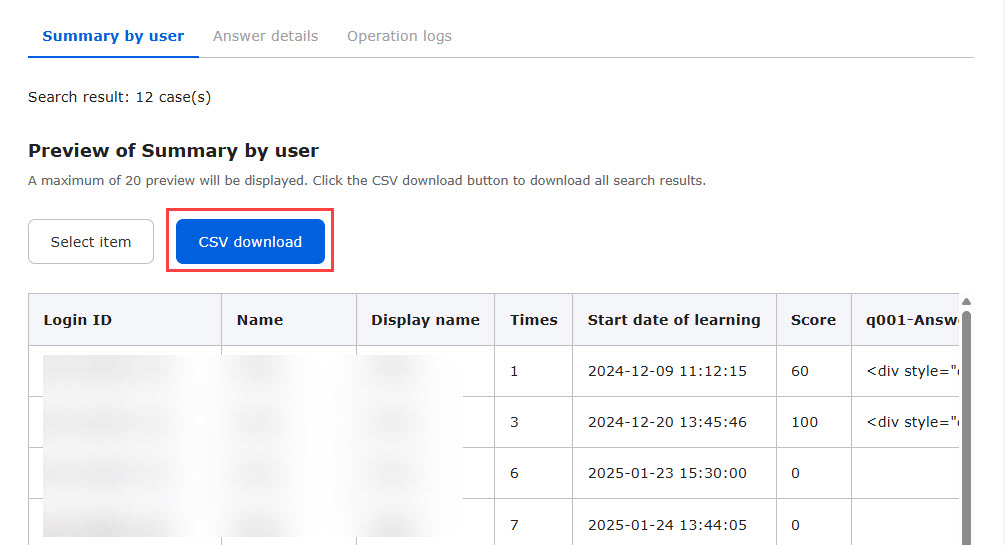
04. CSV Download
You can export grade data per content via a CSV file.
Select a tab to download data.
Click on "CSV download."
" in SettingsOperation permissionIf "Restrict CSV export of grades for which you do not have grade management permissions (edit/grade)" is set to "On" in [...], the "Download CSV" button will not be displayed to administrators who manage all grades for the relevant content with view-only permissions. If you have edit or grading permissions for even some of the grades, you can download the CSV.
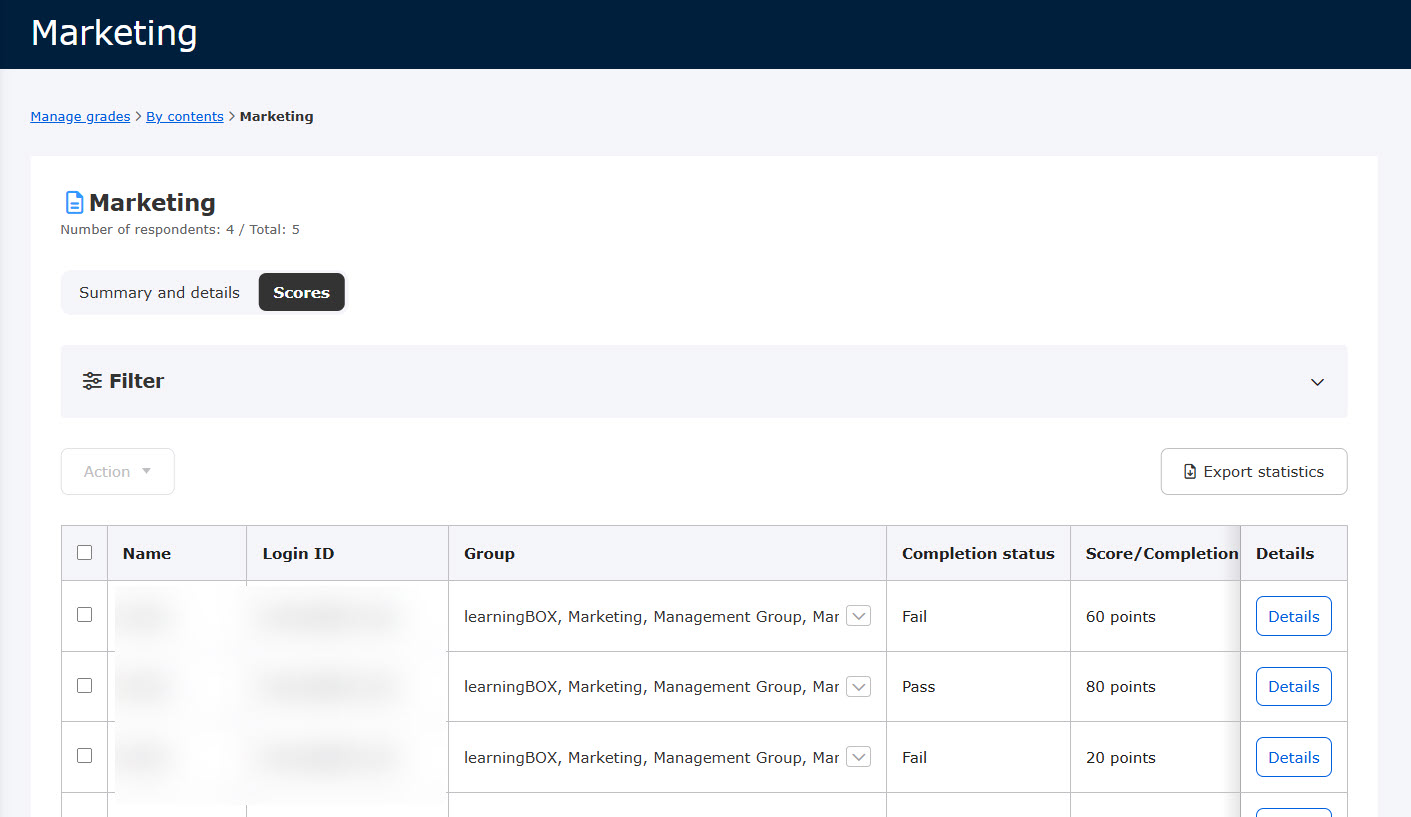
Scores
01.Grade list
Assigned grade data will be displayed.
To check the details, click on the Details.
02. Search
To specify the results, selec the criteria.
Click on the search button.
*The previous completion status is selectable to search results.
*In the "Others" section, the highest or latest scores can be selected.

03. Batch operation
To operate in bulk, tick the boxes and click the Action.
Required
Grade manager (Edit)
To use the "Re-run Grading by Tag" feature, you must have grade management editing permissions (for all users and all content).
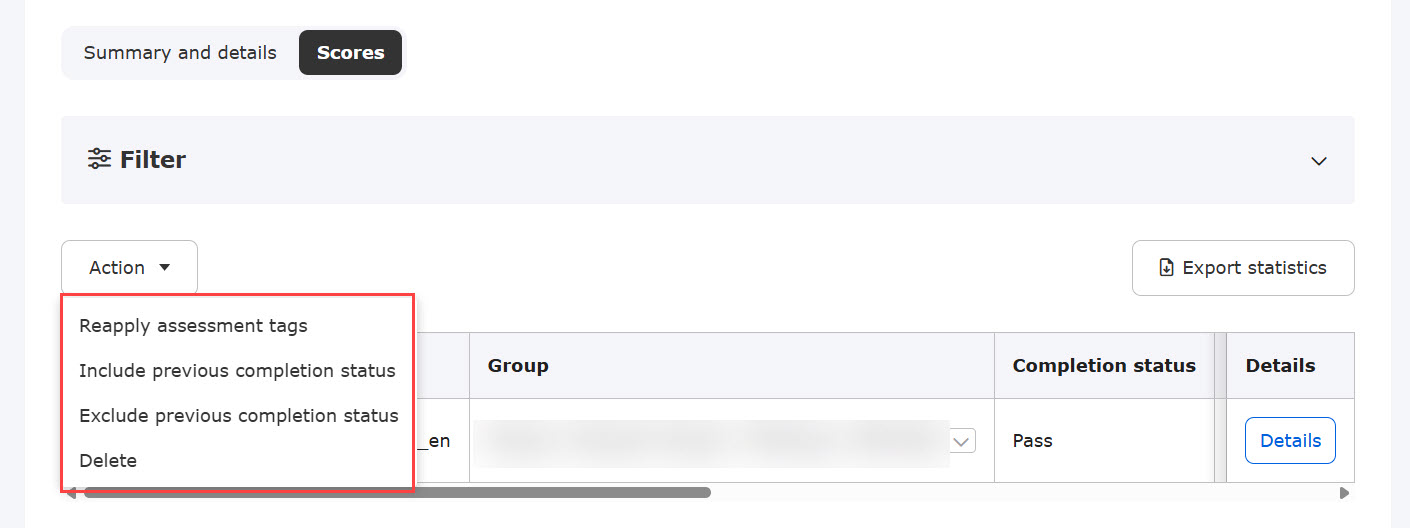
▼Apply assessment tags
You can apply Assessment tags to quizzes or exams after the submission.
The action will be recorded on the Update history in the Grade details.
To apply assessment tags after the submission, the following criteria will be required.
Completion status: In progress/Waiting for grading/Pass/Fail
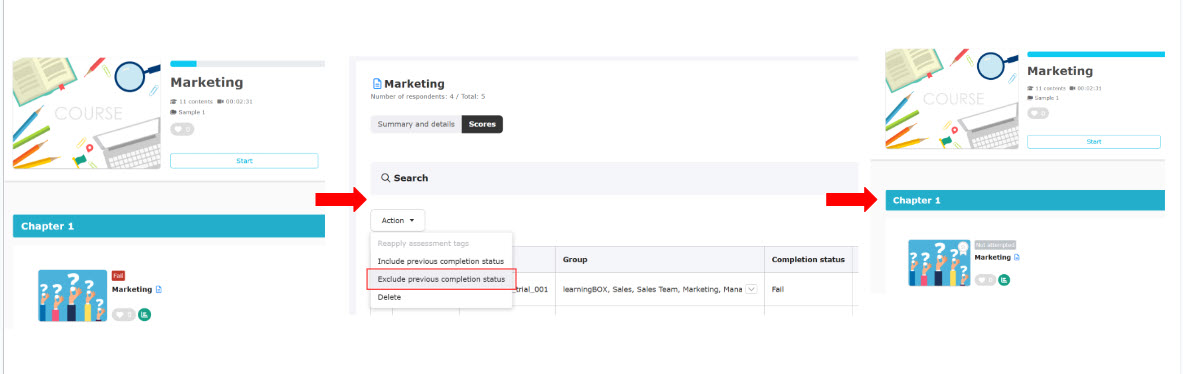
▼ Include/Exclude the previous completion status
You can include or exclude the previous completion status from the grade data.
Once applied, the grade details will be updated.
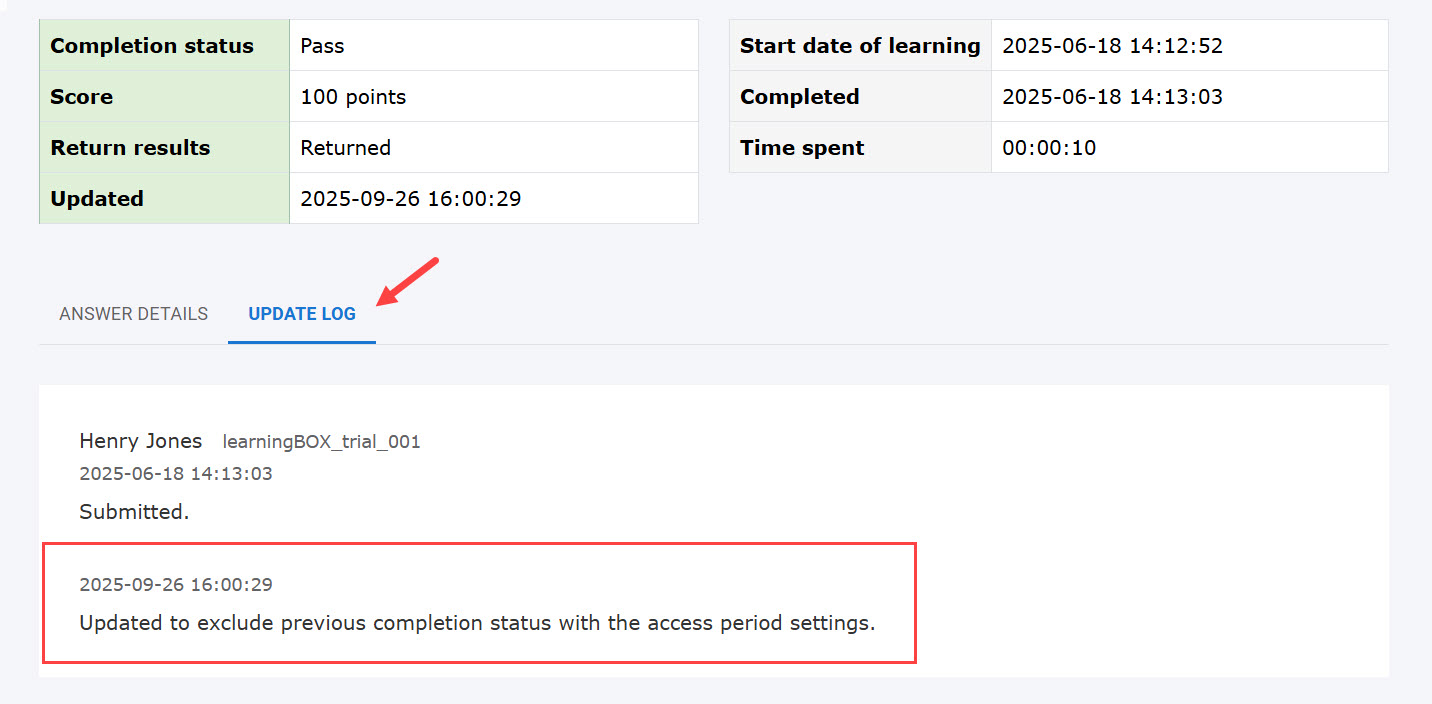
When you select "Exclude previous completion status," the completion status in the user interface will be "Not attempted."
▼Delete
Multiple grade data can be deleted.
04. Report Output
You can generate reports on “survey results, quiz and test results, and video viewing history.”
*For more details, refer to Export statistics.

05. Download Report Card Data as a CSV File
You can download grade data from report cards linked to diagnostic tests in CSV format.
*The maximum number of records that can be output is 10,000.

▼Panels Available for Download
The following four panels are available for download.
- Table Panel—Analysis Results of Characteristic Tags
- Text Panel—Minimum/Maximum Values for Attribute Tags
- Text Panel—Combinations of Attribute Tags
- Text Panel—Evaluation Results for Multiple Attribute Tags
▼CSV Display Contents
It will be downloaded as a CSV file.
Please note that the panel data will be output in the same order as it appears in the grade report.
If no panel title is specified, the field name in the CSV output will be "Panel Category>Panel Type_Characteristic Tag Name."
If there are no panels to download in the report data, the field will be blank.
If you edit a report card panel (delete it or edit the panel ID), existing panel data will no longer be output.
Regarding Group Membership
When you belong to multiple groups, they are separated by ||. Nested (hierarchical) groups are separated by >>>.
Example:
Group A||Group B
Sales Department >>> Sales Section 1
Force scoring of quiz/exam
When there is a paused quiz/exam, the Grade manager can forcibly score the content.
*"Restart/resume" option is required for this action.
*For more details, refer to Create quiz/exam.
Required
Grade manager (Edit)
Only the grades of users whose status is “Active” or “Paused” are included.
01. Force scoring
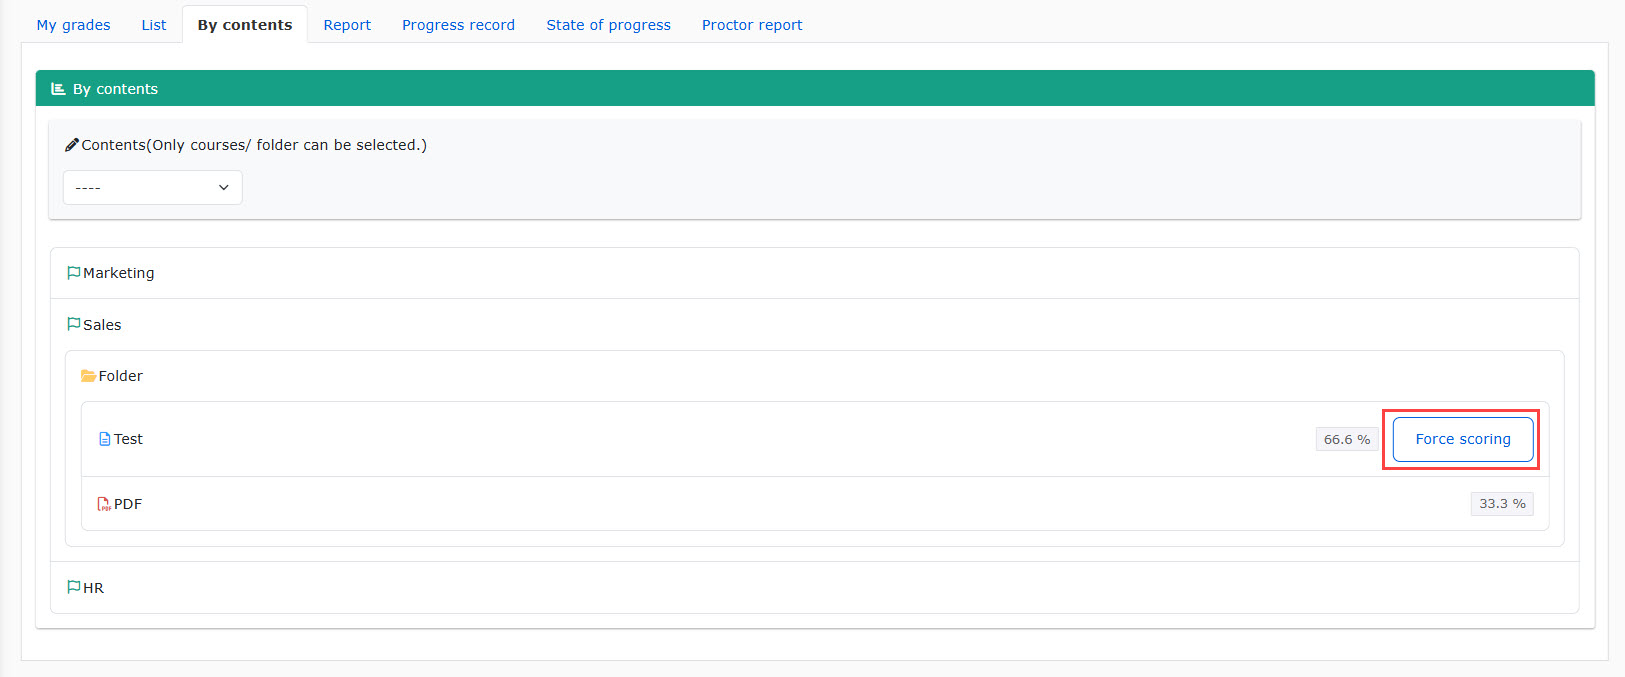
From the side menu, go to "Manage grades" > "Per content"
Next, select the content you created in the quiz or test, then click "Force Grading."
02. Execute
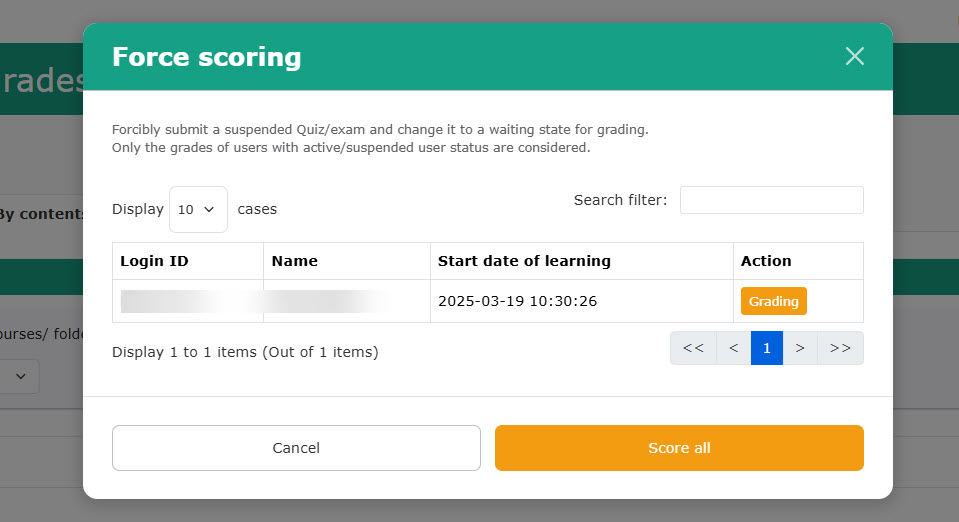
The following window will appear.
Click "Grading."
To score all paused content, click "Score all."
03. After the execution
When content is forcibly scored, unanswered questions will be regarded as incorrect.
The socre will be updated with the modification.
Force submission of questionnaires
When learners close the questionnaire with unanswered questions, the Grade manager can make the questionnaire completed.
*For more information on creating a questionnaire, refer to Questionnaire.
Required
Grade manager (Edit)
Only the grades of users whose status is “Active” or “Paused” are included.
Force submission is only available for questionnaires created using the Questionnaire creation form.
01. Force submission
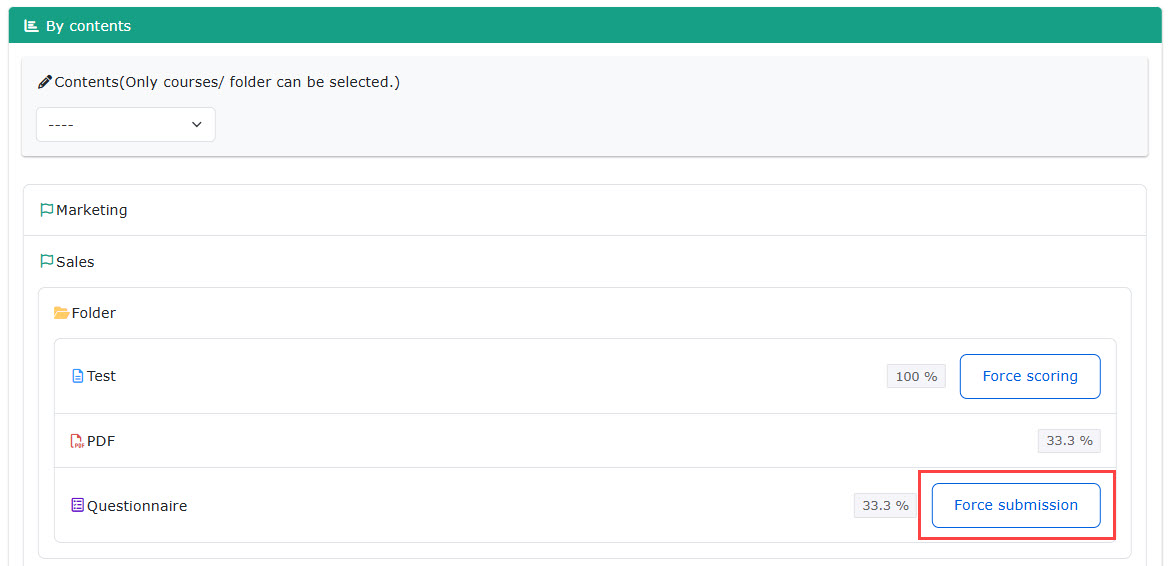
From the side menu, go to "Manage grades" > "Per content"
Select a questionnaire and click on "Force submission."
02. Execute
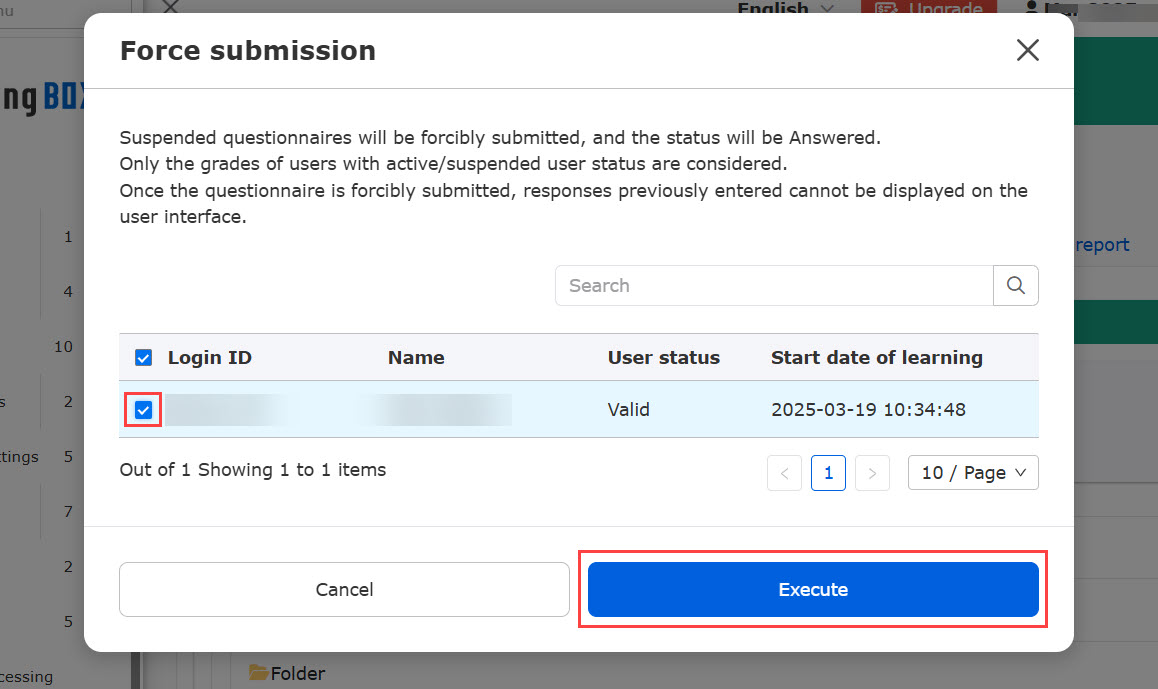
The following window will appear.
Tick the boxes and click on "Execute."
You can search users in the search window.
03. After the execution
After the execution, completed answers will be saved while unanswered questions are regarded as unanswered.
The socre will be updated with the modification.
Importing Diagnostic Test Answers
You can enter the results of the diagnostic test into a CSV file and upload it.
This makes it possible to import diagnostic test response data collected on paper or other media.
Required
Grade manager (Edit)
- You must register your user account in advance.
- You can still import even if the status is "Inactive/Paused."
- Content can be imported even outside the publication period or if it has not been assigned.
01. Open the screen for importing responses
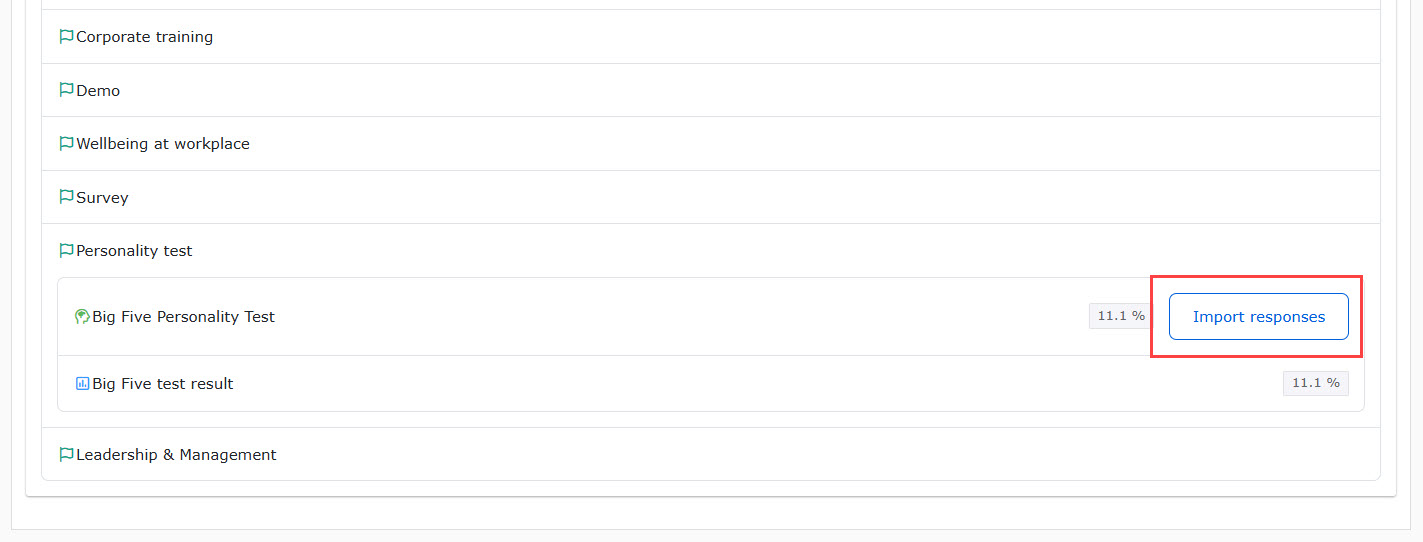
From the side menu, go to "Manage grades" > "Per content"
The "Import Answers" button appears on diagnostic tests for which you have grade management editing permissions.
When you click, a screen for importing responses will appear.
02. Creating a CSV File
First, create a CSV file.
▼Step 1
Select a group from the drop-down menu, then click "Download Template" to download the template CSV file.

▼Step 2
Next, click “Download List of Option Numbers” to download a CSV file containing a list of option numbers and their corresponding options.
Please use this as a reference and enter the information into the template you downloaded in Step 1 to create the CSV file for upload.

03. Upload CSV file
Upload the CSV file you created in “02. Creating a CSV File.”
Please drag and drop the file into the dotted-line box, or select it from "Select File" to upload it.

The maximum number of records that can be imported is 1,000.
04. Reflection on the Report Card
If diagnostic tests are linked to report cards, you can automatically generate report cards that reflect the diagnostic results based on the imported responses.
If you wish to use this feature, check the "Apply" box and select the report cards from the drop-down menu (*You can select up to 5 items).
If you do not wish to use this feature, please check the "Do not apply" box.

05. Review the Content
Once you have selected the files and decided whether to include them on the report card, click “Confirm Details.”
When the screen below appears, click "Import Responses."
*To import responses, go to “Background.
If an error occurs, fix the issue and click Retry upload.
You can toggle Show only errors to view only the rows containing errors.
Note
When you import answers for a diagnostic test, the import history will appear on the "Grading and Update History" tab of the diagnostic test results details screen.
(If you have configured this to be reflected on the report card, it will also appear on the report card's grade details screen.)
In addition, the "Device and Browser" section will be hidden.
